Super Blood Wolf Moon Landscape Photography

I have the absolute best people in my life. My sister and her husband originally told me about this natural phenomenon. Then, a couple weeks later a couple of good friends asked me if I heard about it. Finally, a few days before the occurrence, my mom sent me a text telling me about it. Seriously though? How cool is that? I have such an amazing support system for my photography. Whenever something cool is happening, I know that I will hear about it one way or another.

Super Blood Wolf Moon Landscape Photography by Bessie Young Photography.jpg

The Planning

When my sister told me about it, obviously I began researching it. When is it? What is it? Where to see it? I mean all the things 😊 If you want to learn a bit more about all the details make sure to check out my recent post on ‘How to Photograph the Super Blood Wolf Moon’. This blog will give you probably a bit more information than you were expecting about this awesome show that the moon put on.

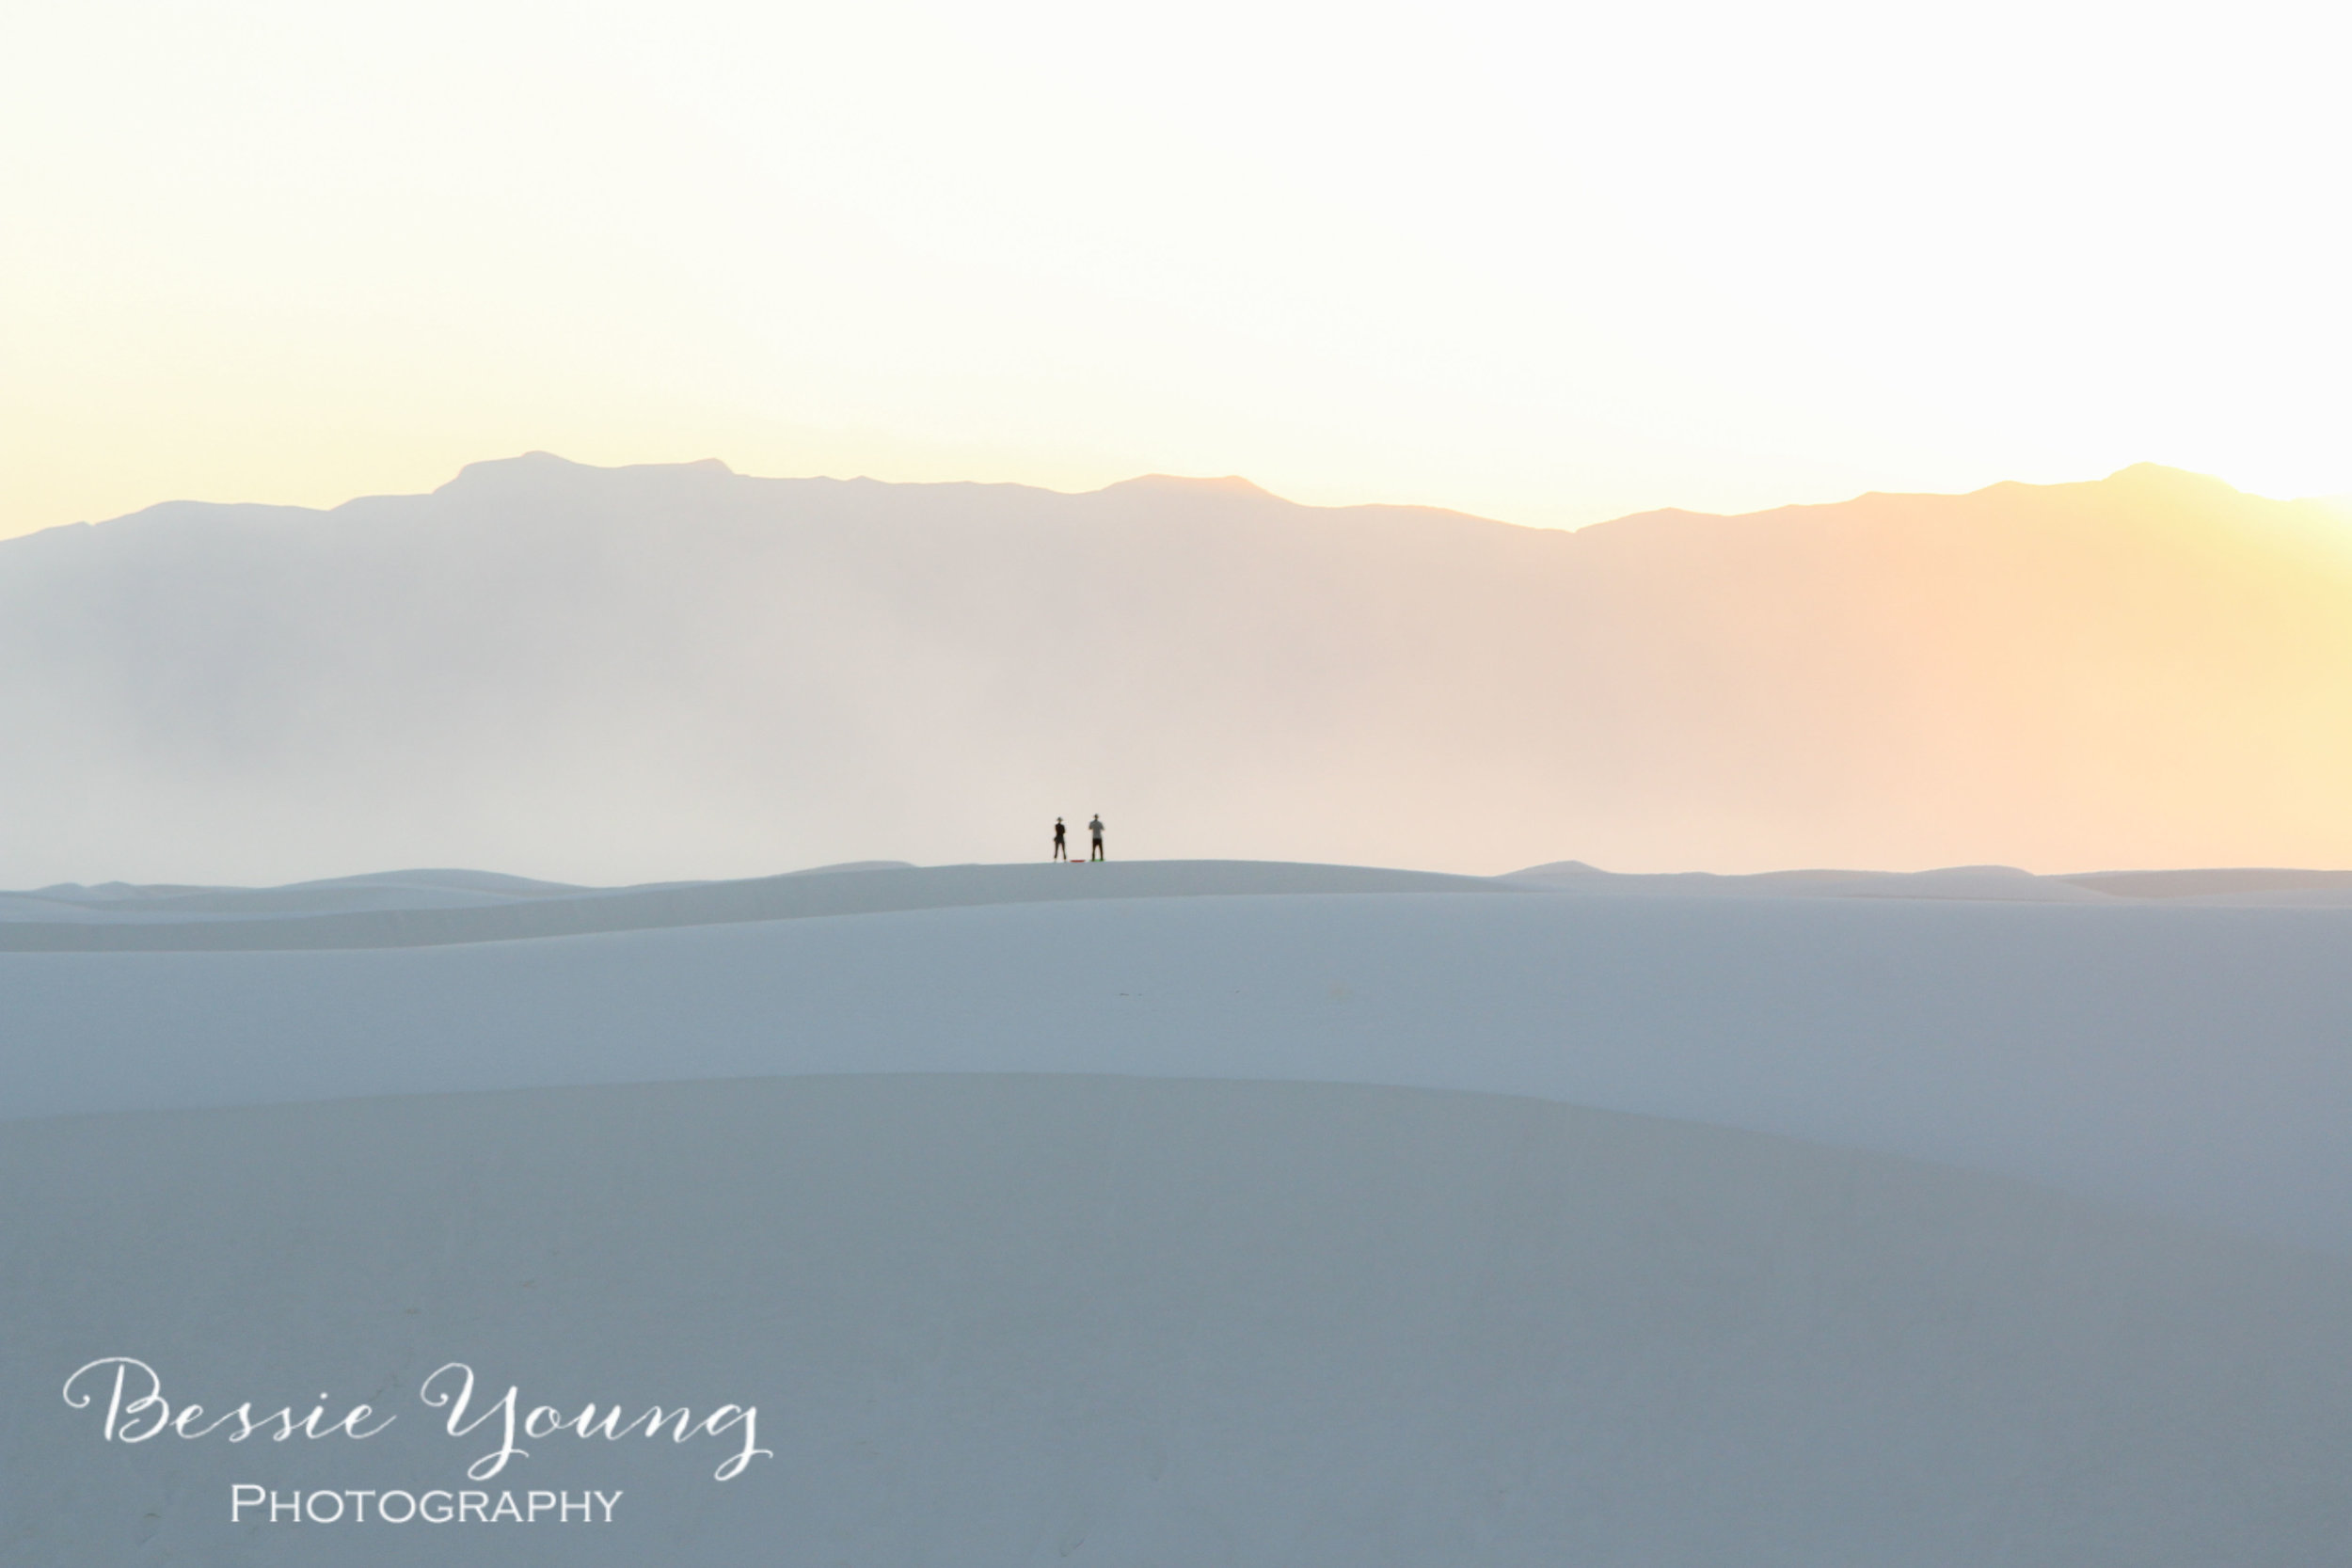
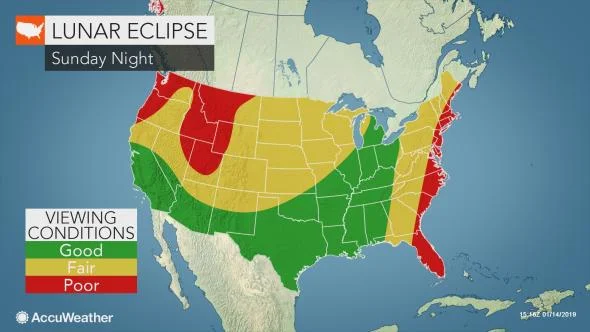
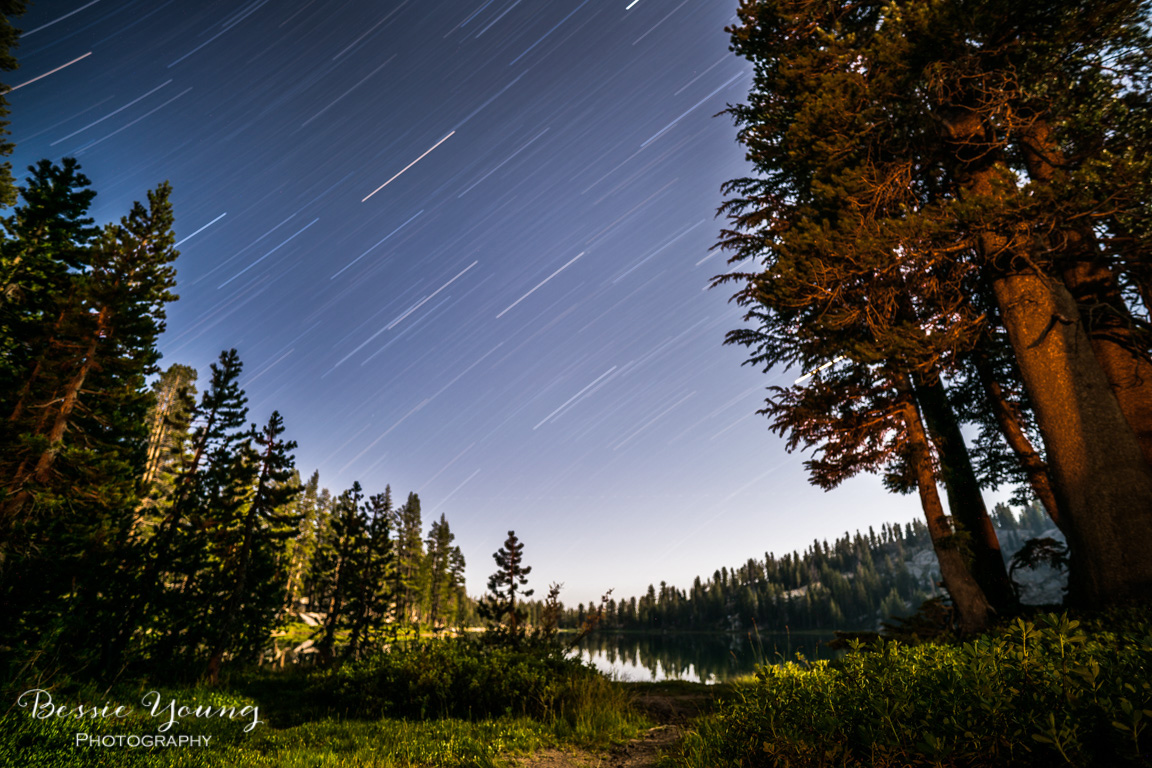
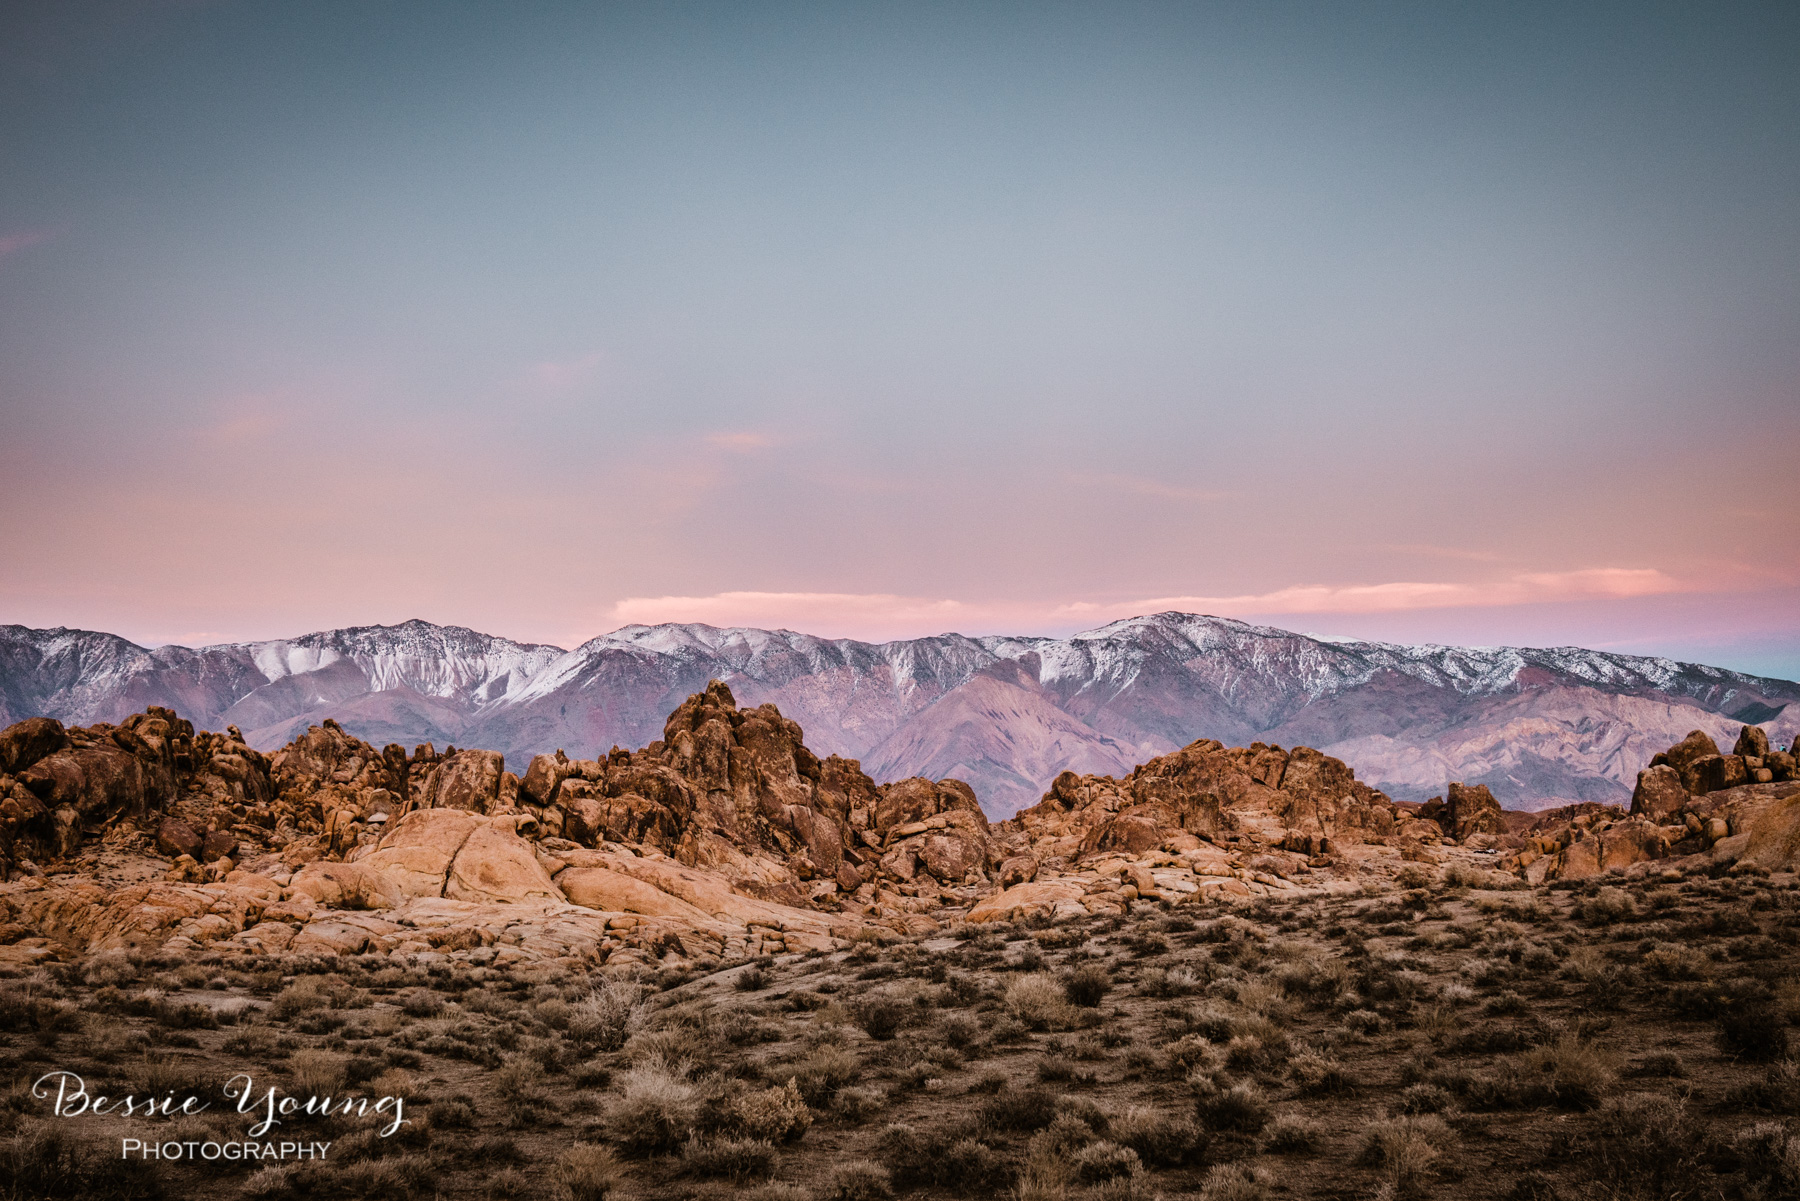
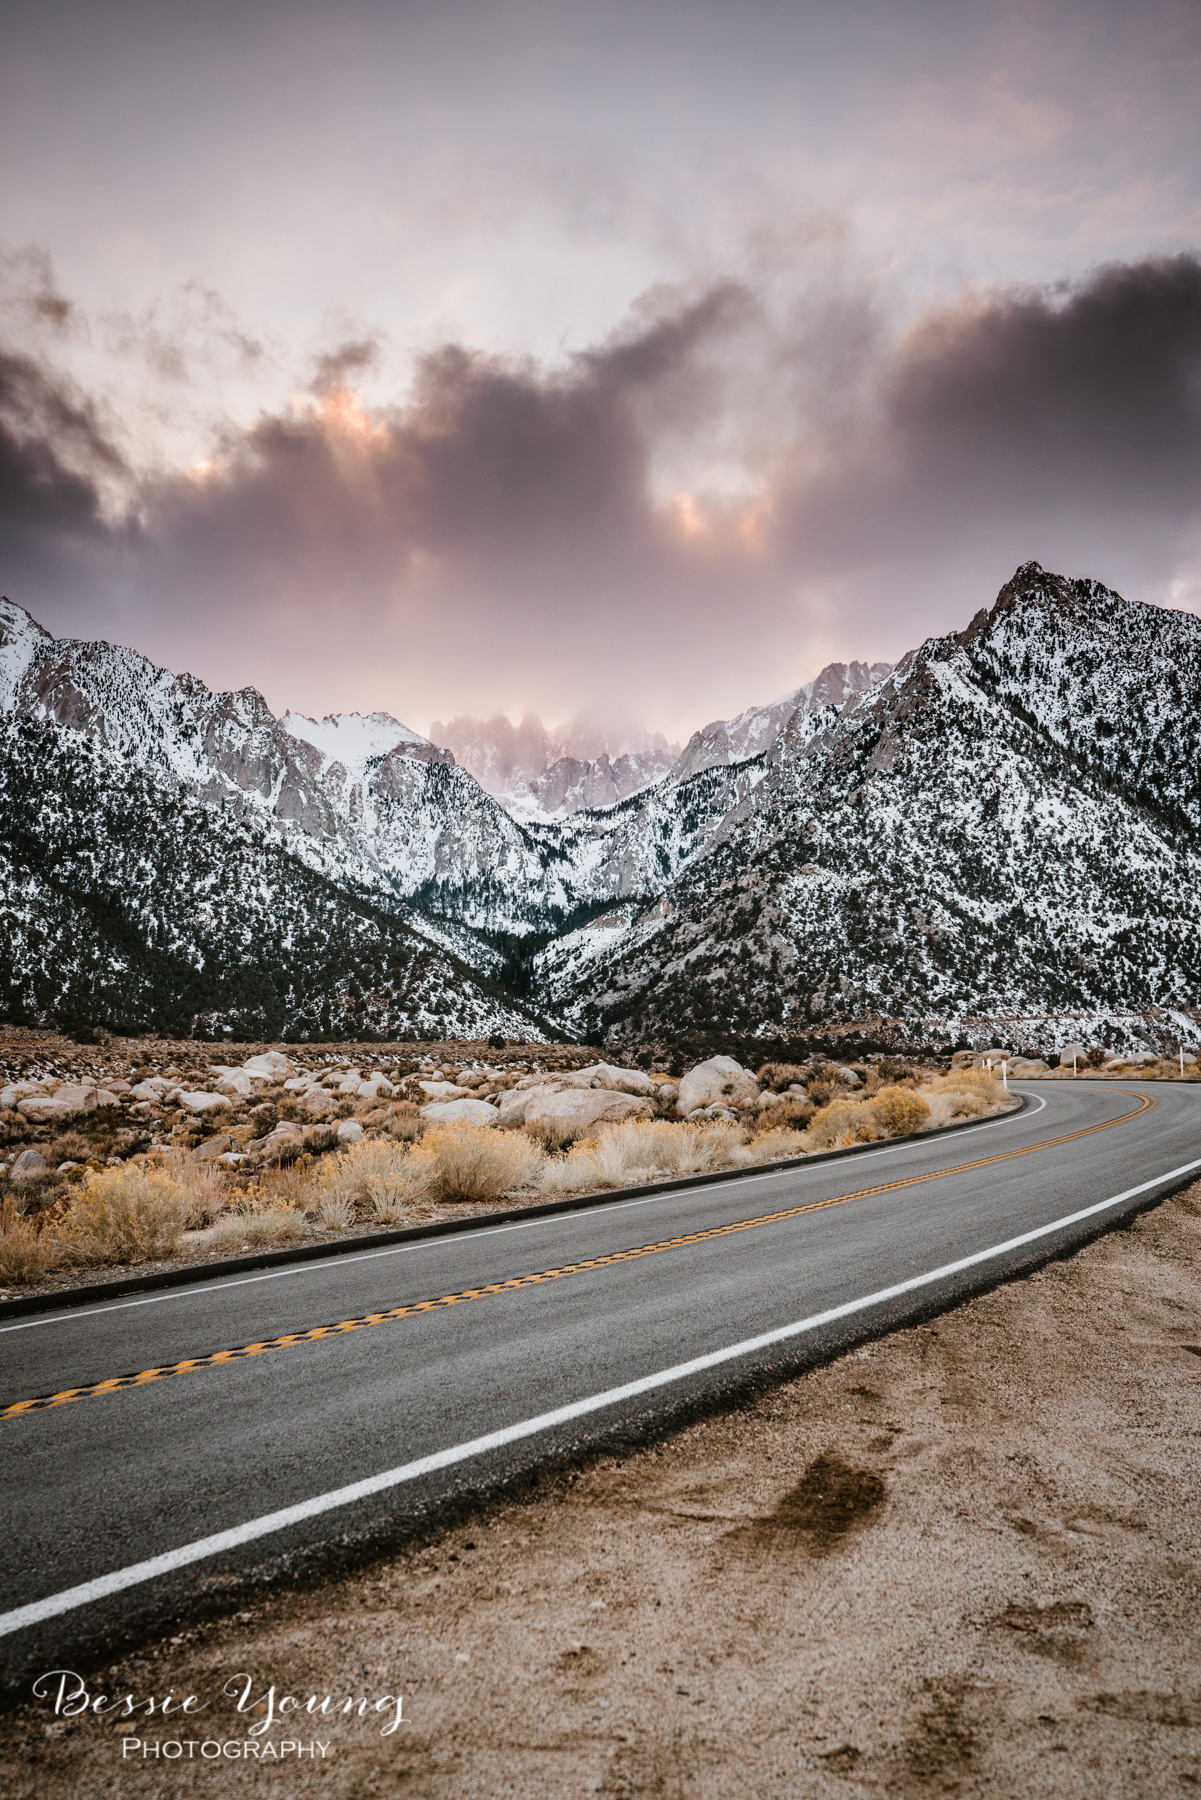
My original plan was to head out into the foothills of my hometown to get some pretty images; however, that plan got thwarted when the weather called for rain. I’m not talking a slight drizzle either. I’m talking about a down pour. As I started to search for places to go and check the weather, it seemed like the majority of the State of California was going to be cloudy during the Super Blood Wolf Moon. Northern California was calling for thunderstorms and Southern California was calling for full cloud coverage. So, I got a little discouraged and figured I wasn’t going to be able to see it. Then I found the spot! The spot that might have a potential to be partially clear during the Super Blood Wolf Moon…. Lone Pine and the Alabama Hills.

The Adventure

The question was, do I want to spend all the time, money, and effort to head over to the Alabama hills with pretty good odds not to see it? Well, I’m somewhat of a gambling girl, so I hopped in the car on Sunday to go and take my chances.

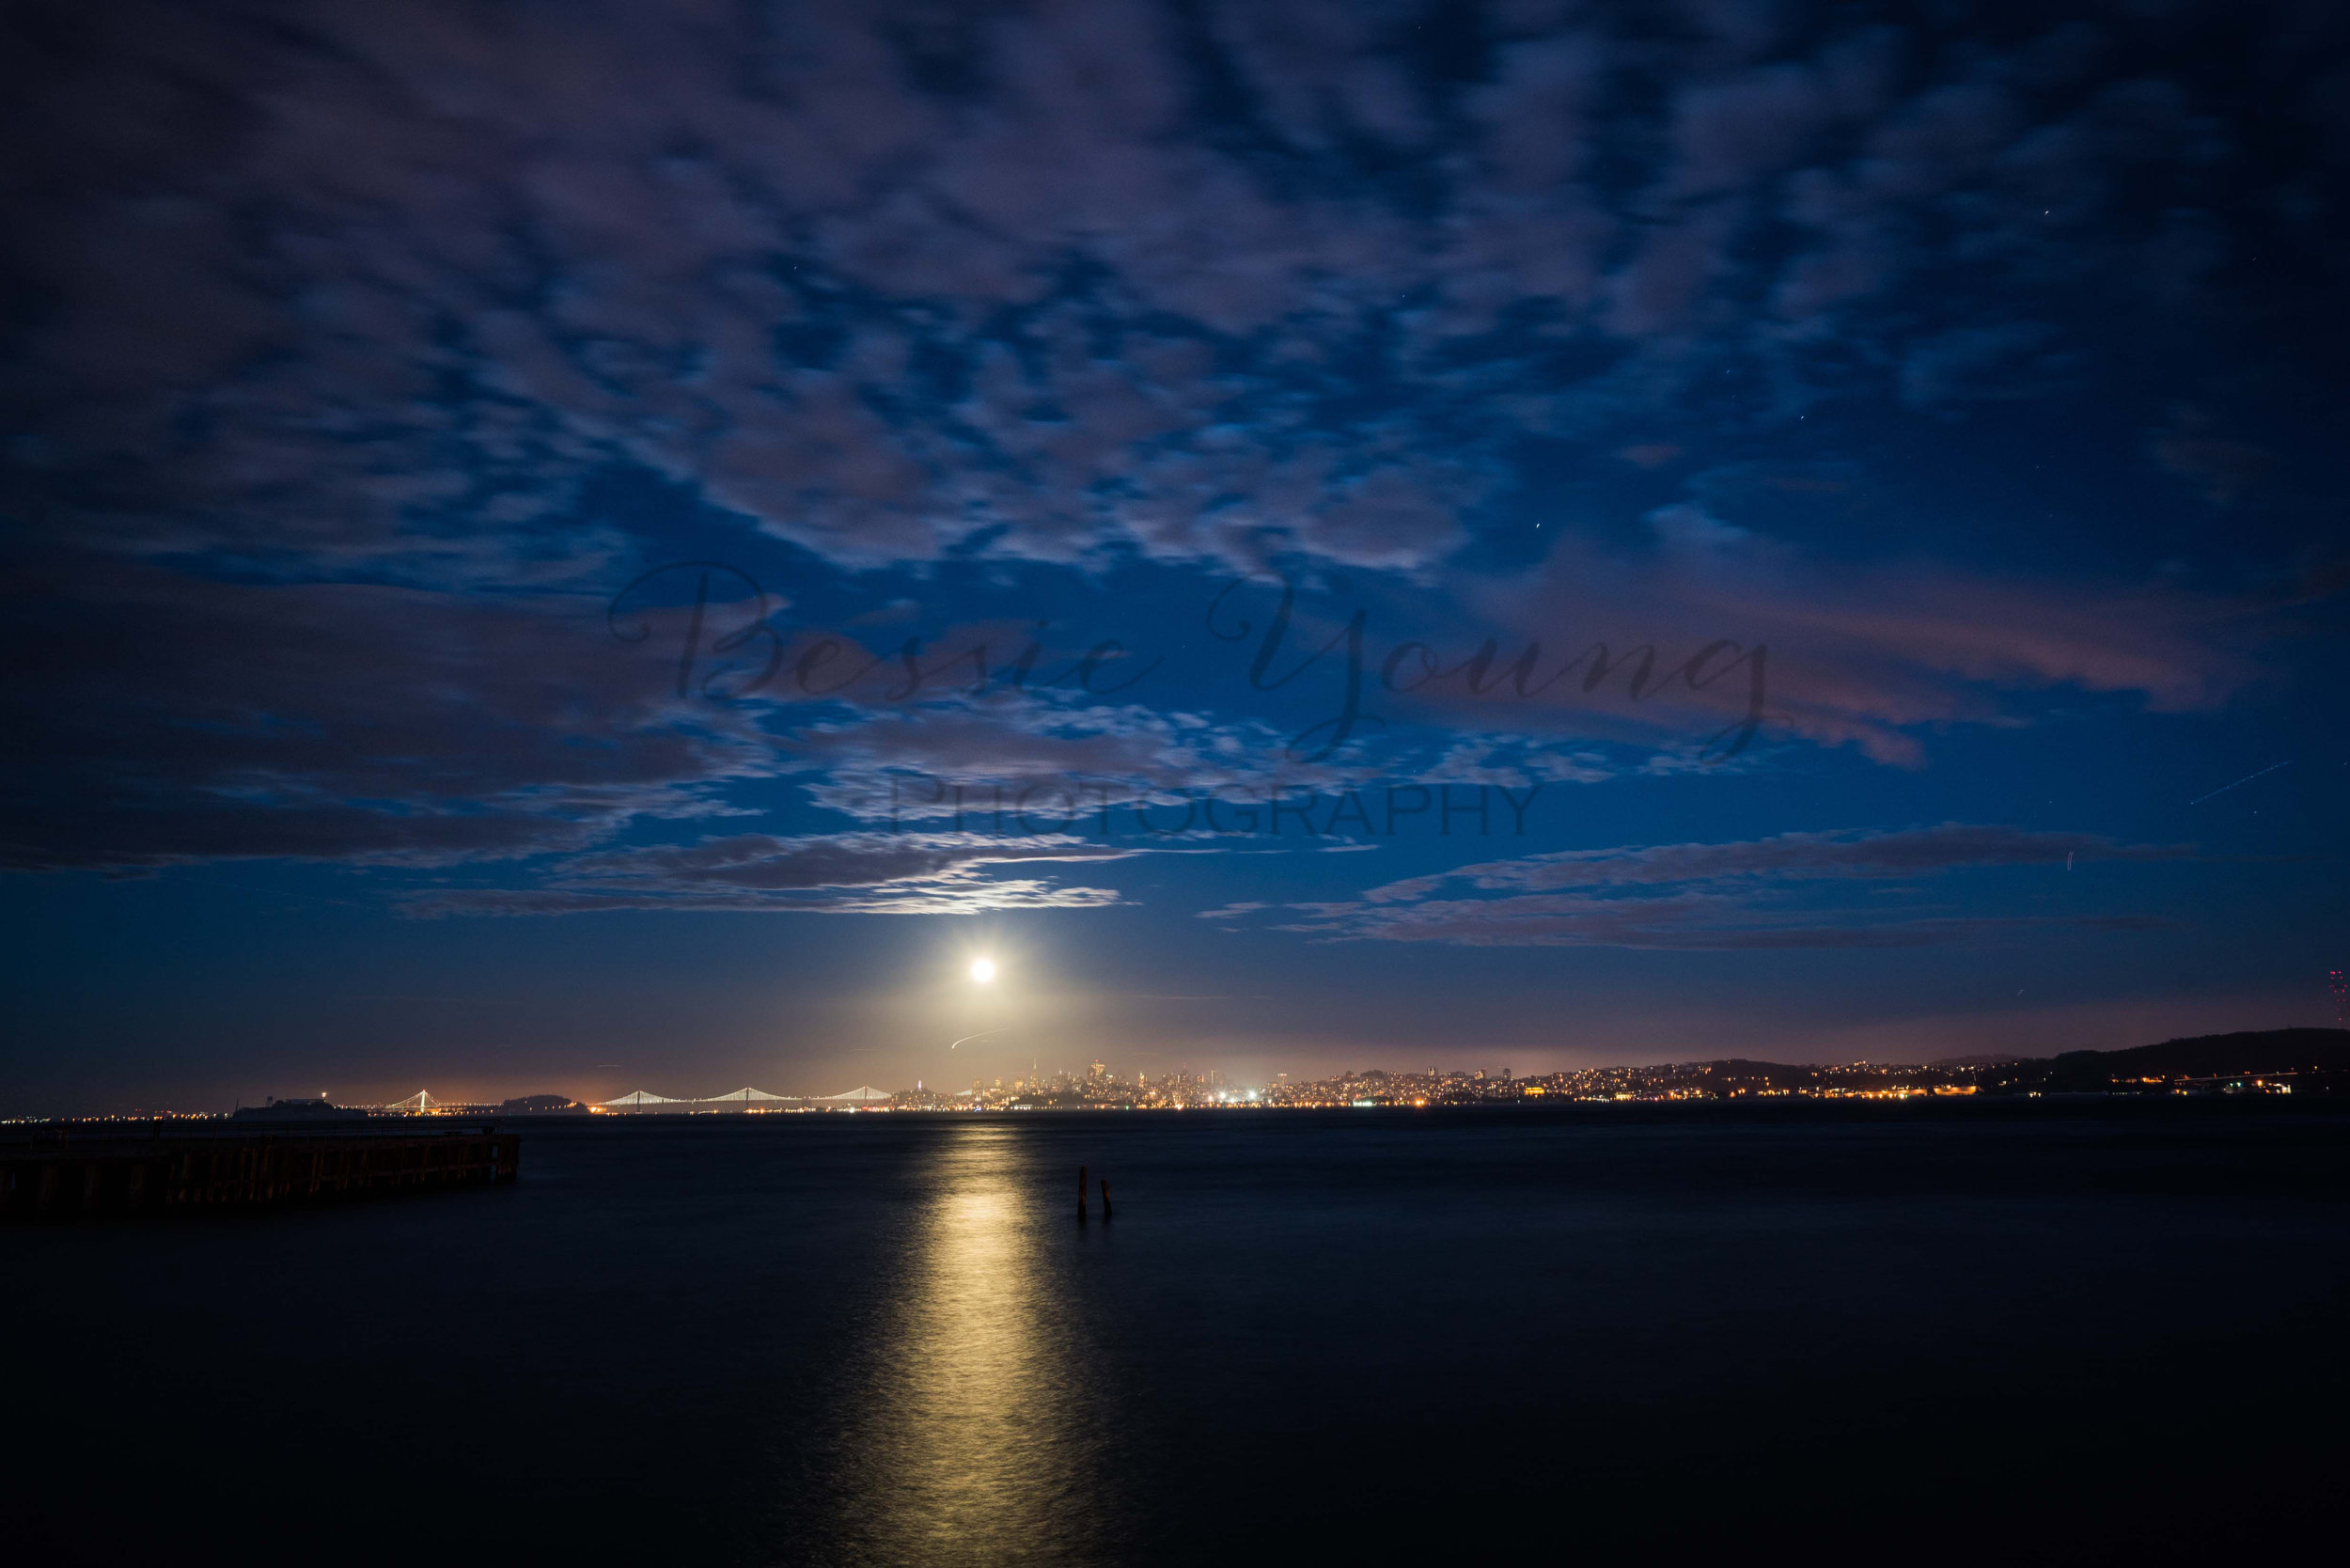
The drive to Alabama Hills is about 5 hours from my town. Not too terrible, but leaving on a whim left me in a little bit of a hurry. The moon was supposed to rise around 5:30pm and I left at 11:30. The eclipse wasn’t supposed to happen until 8pm or so; however, I really wanted to get an image of the Super Moon coming up over the mountain tops.

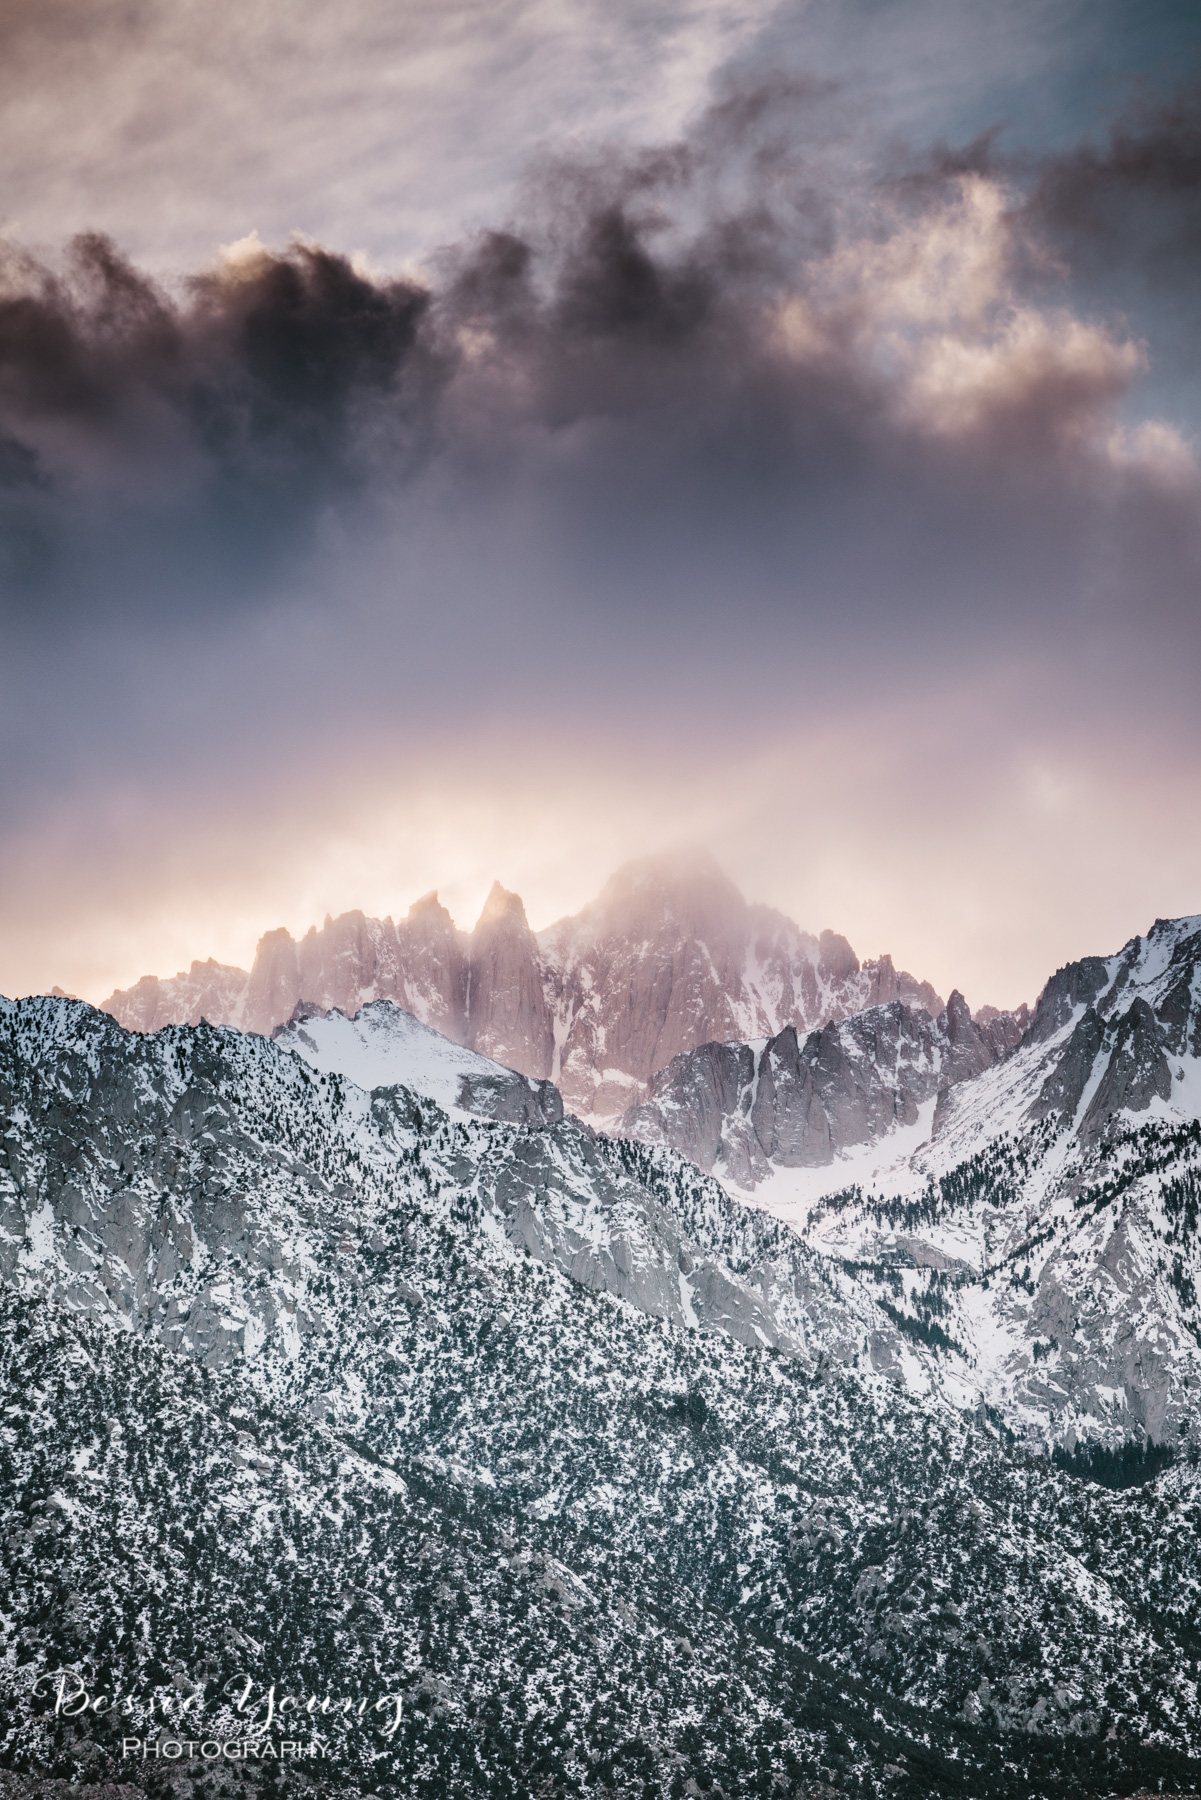
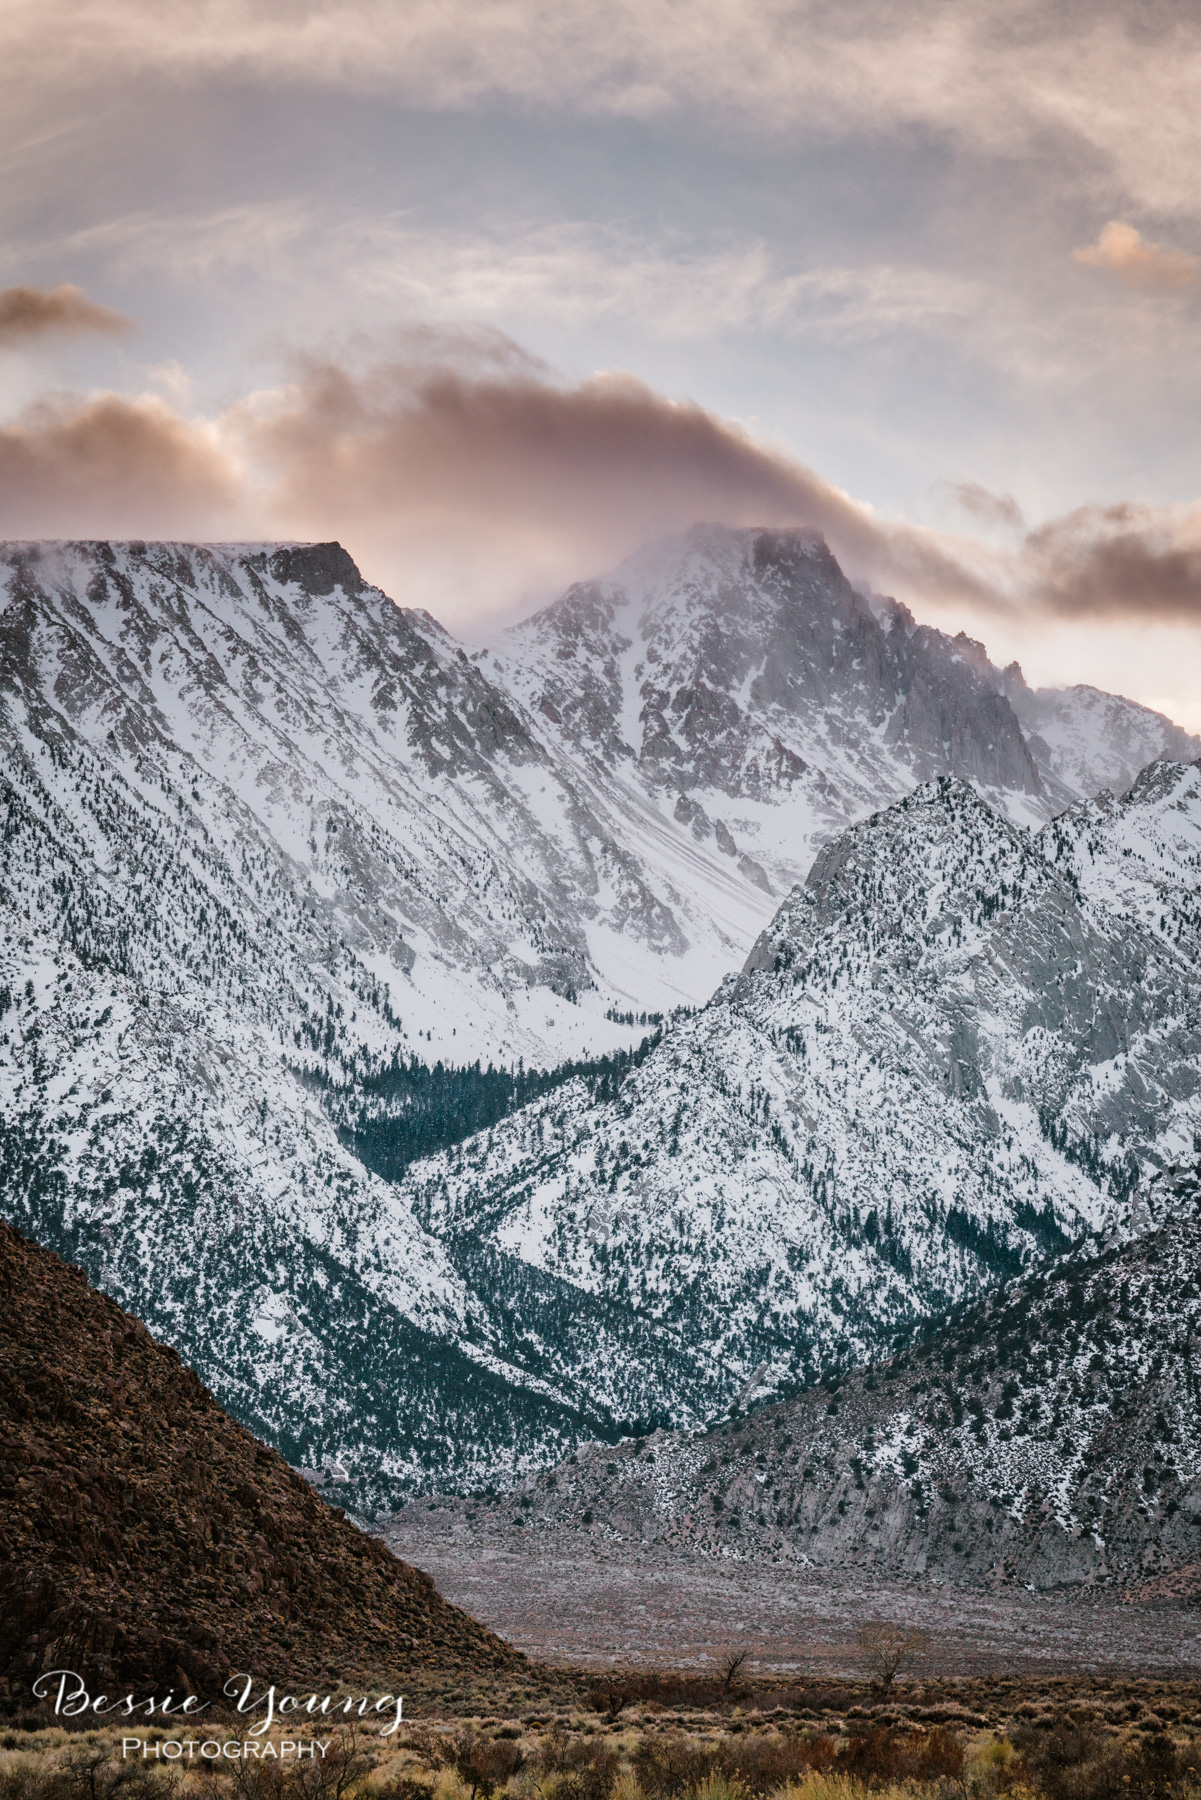
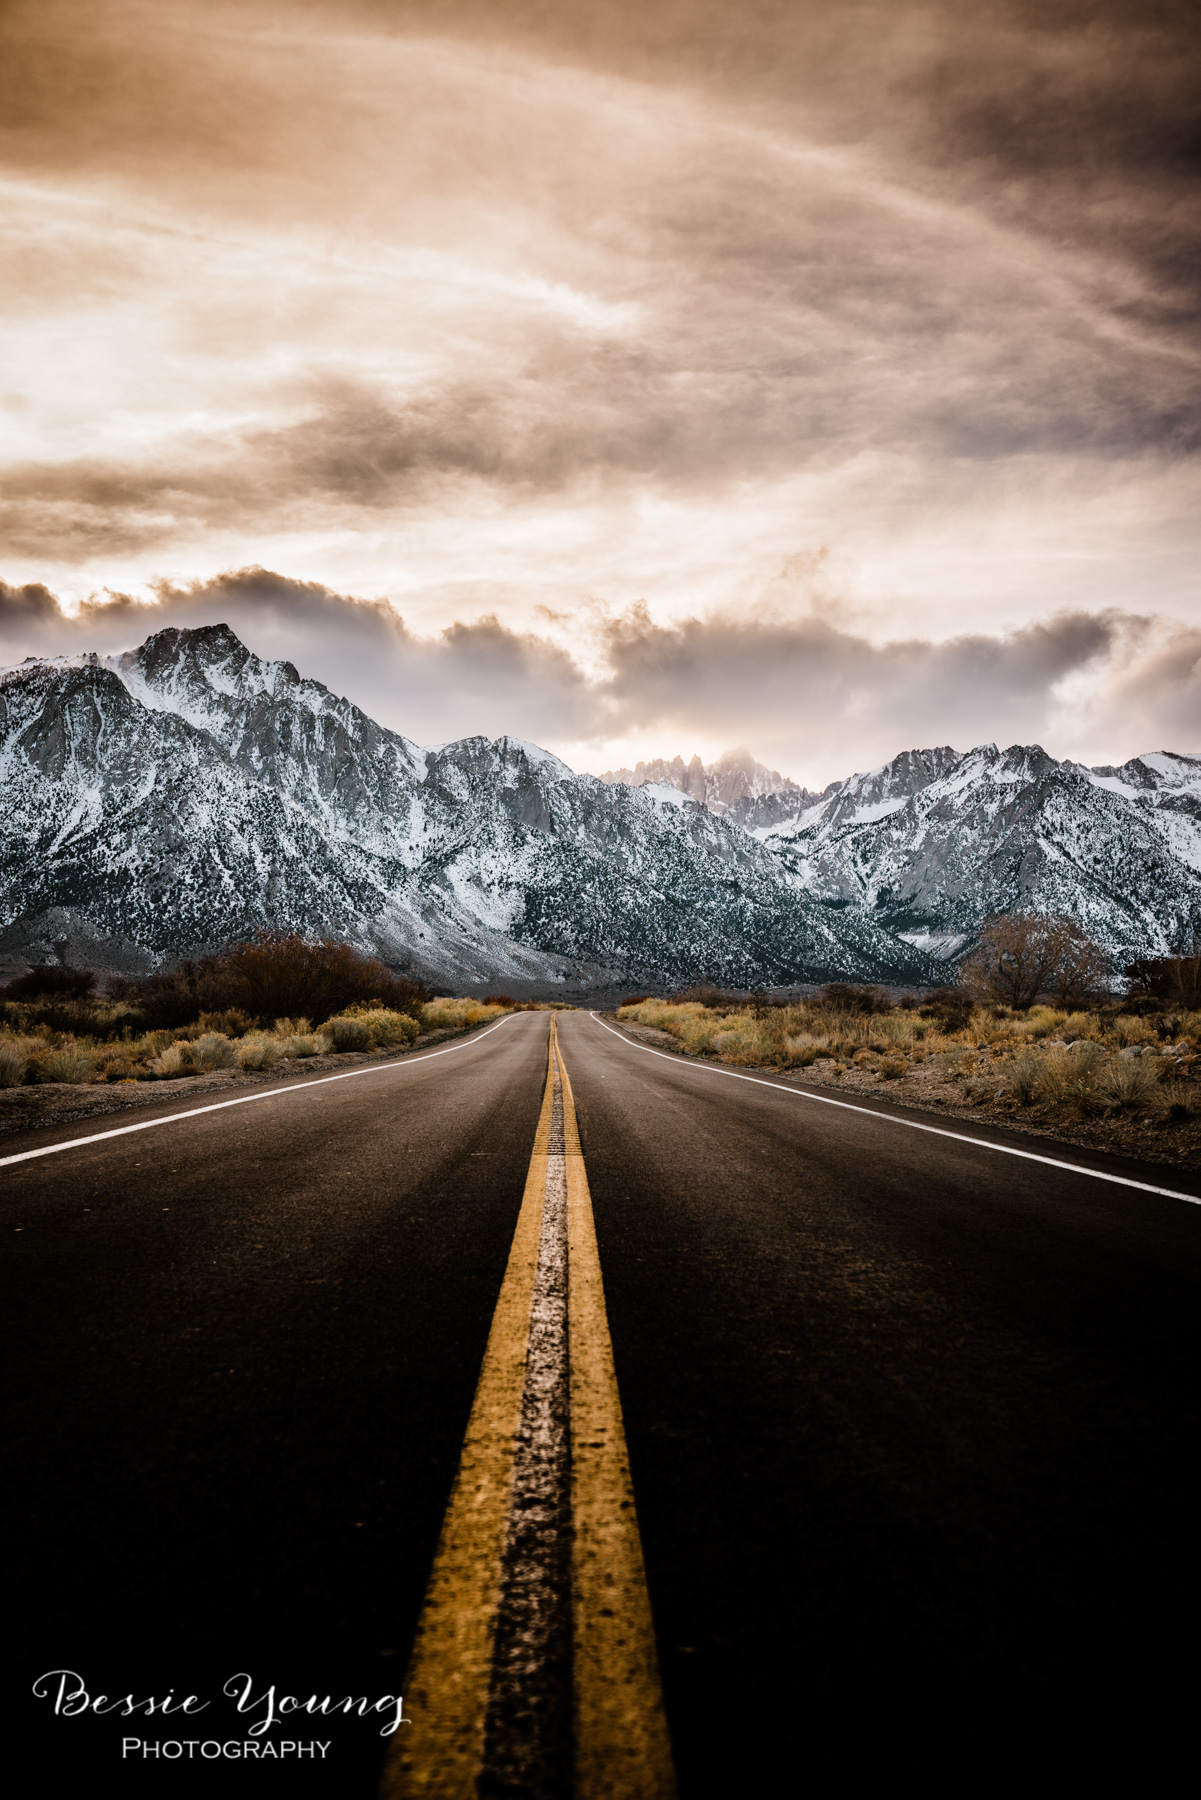
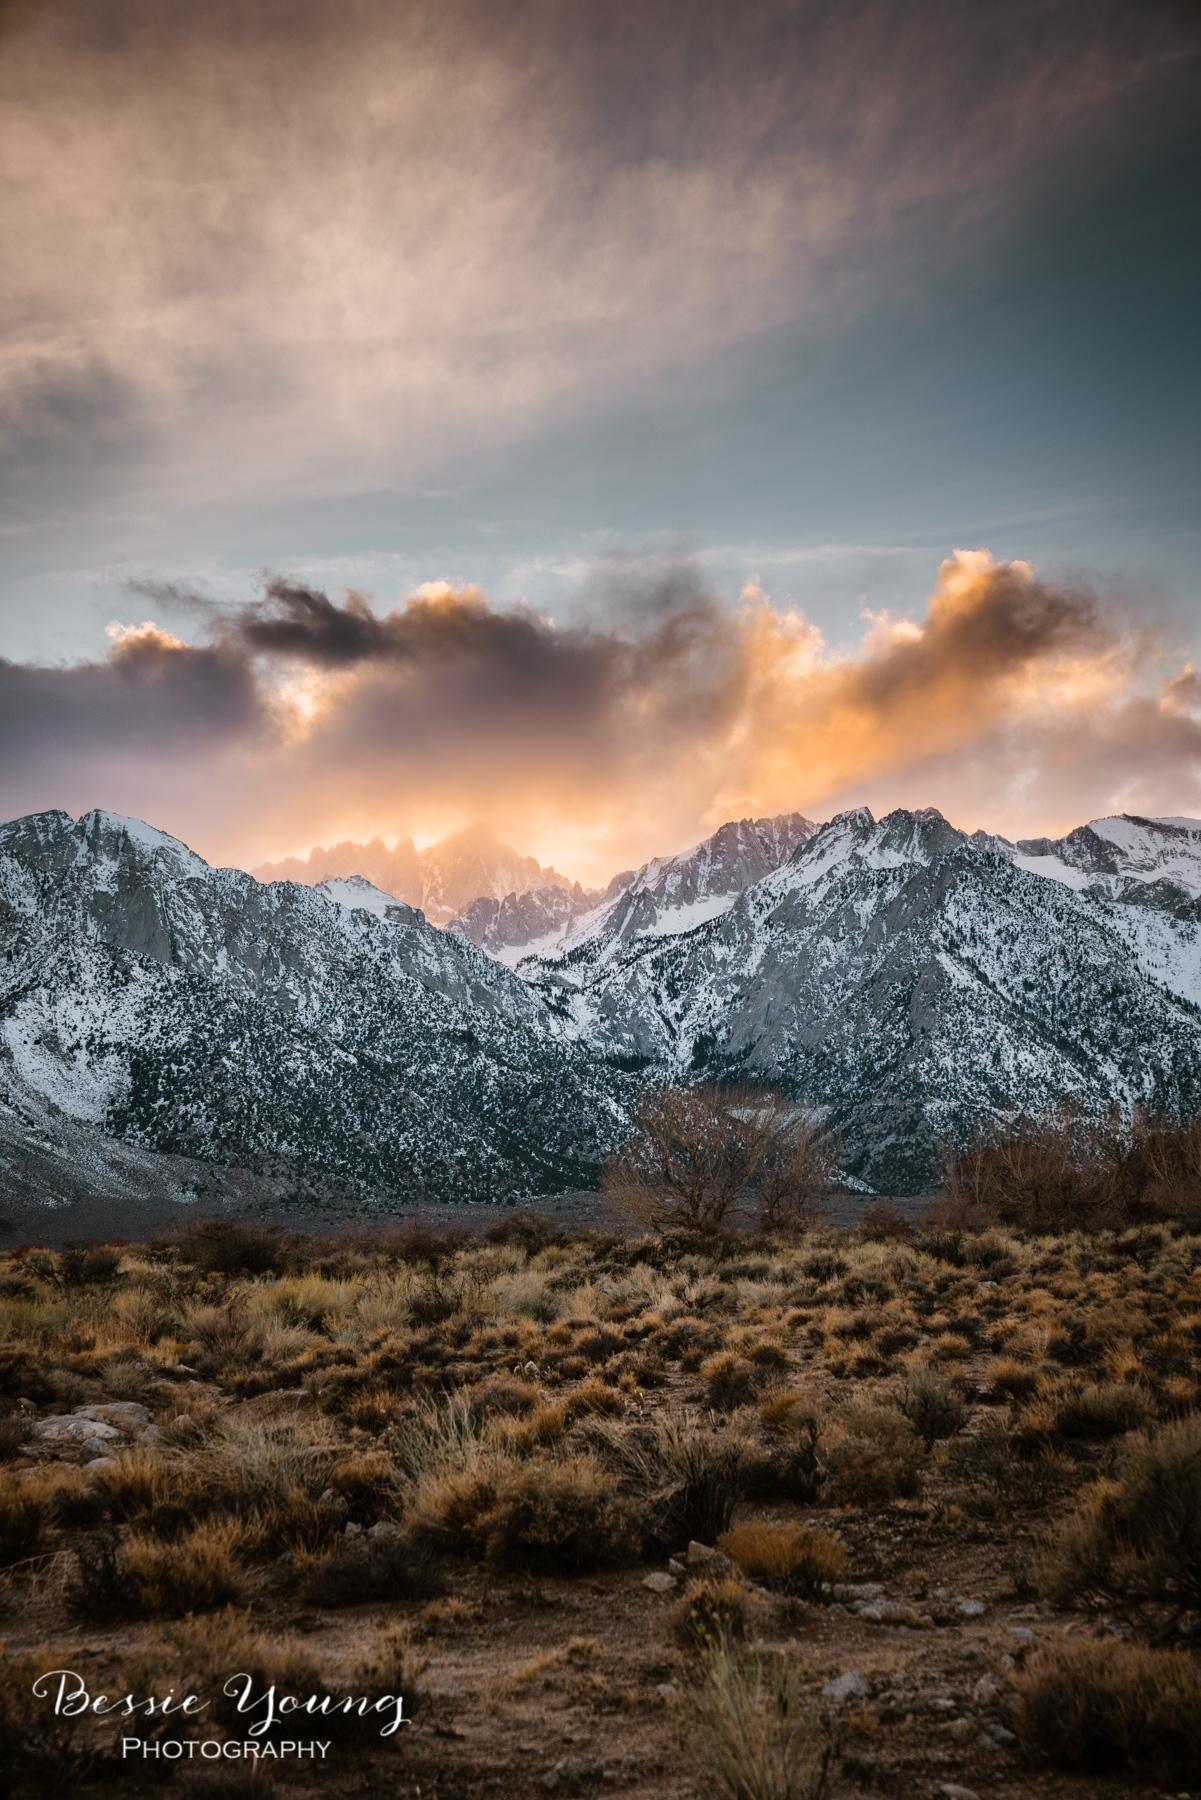
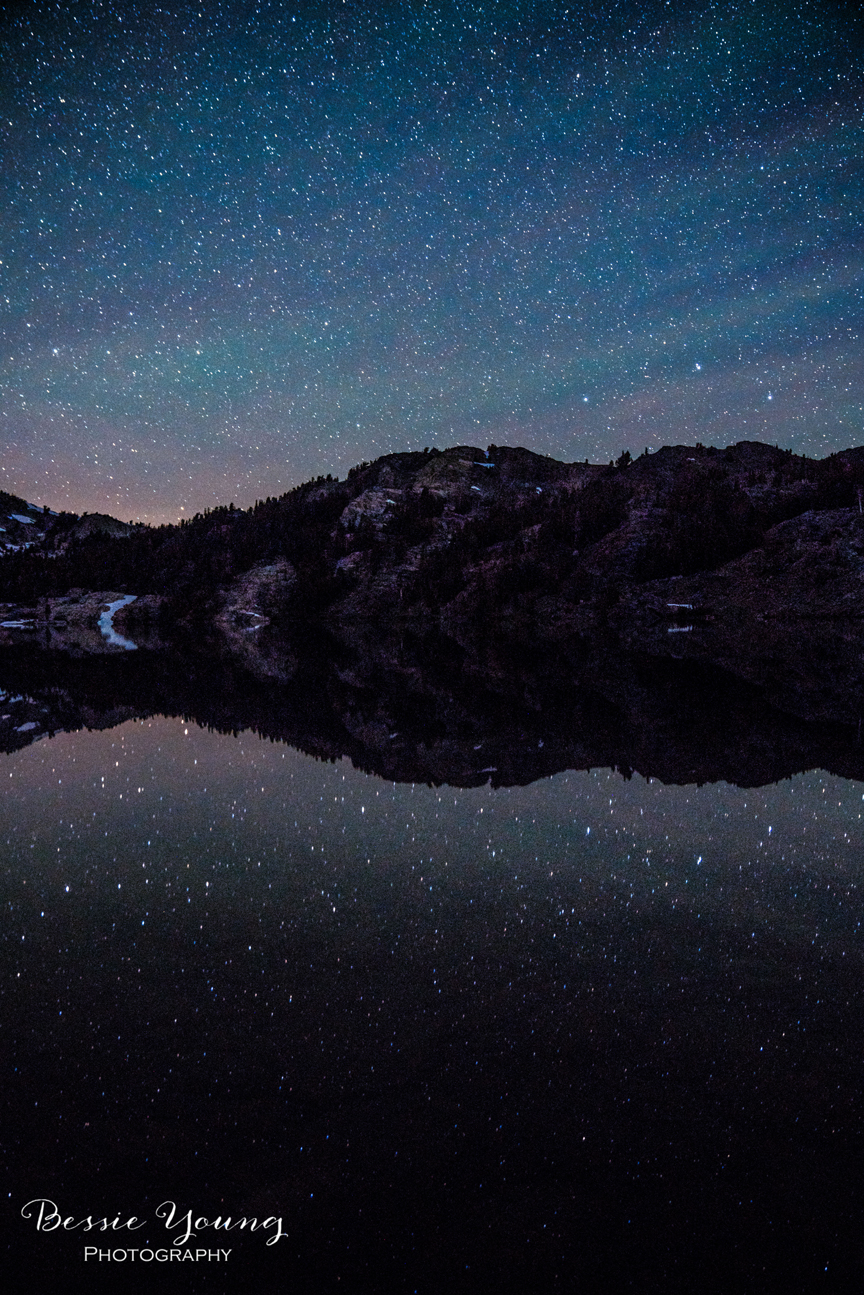
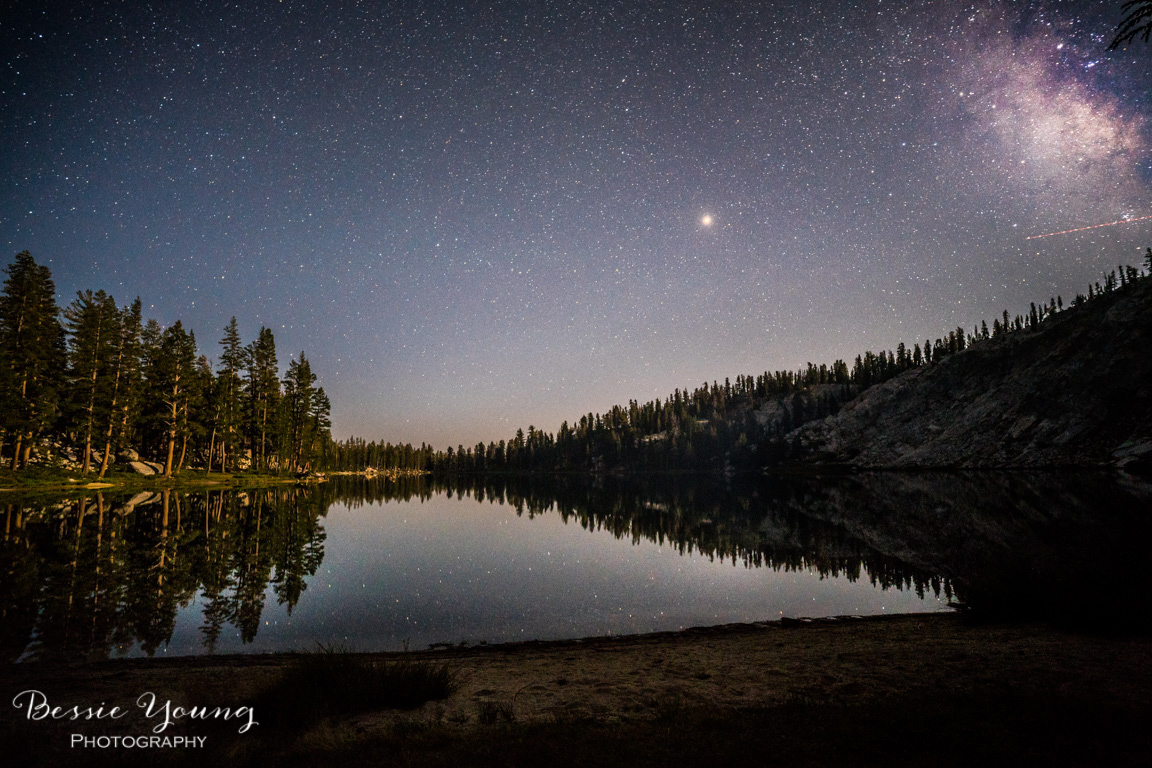
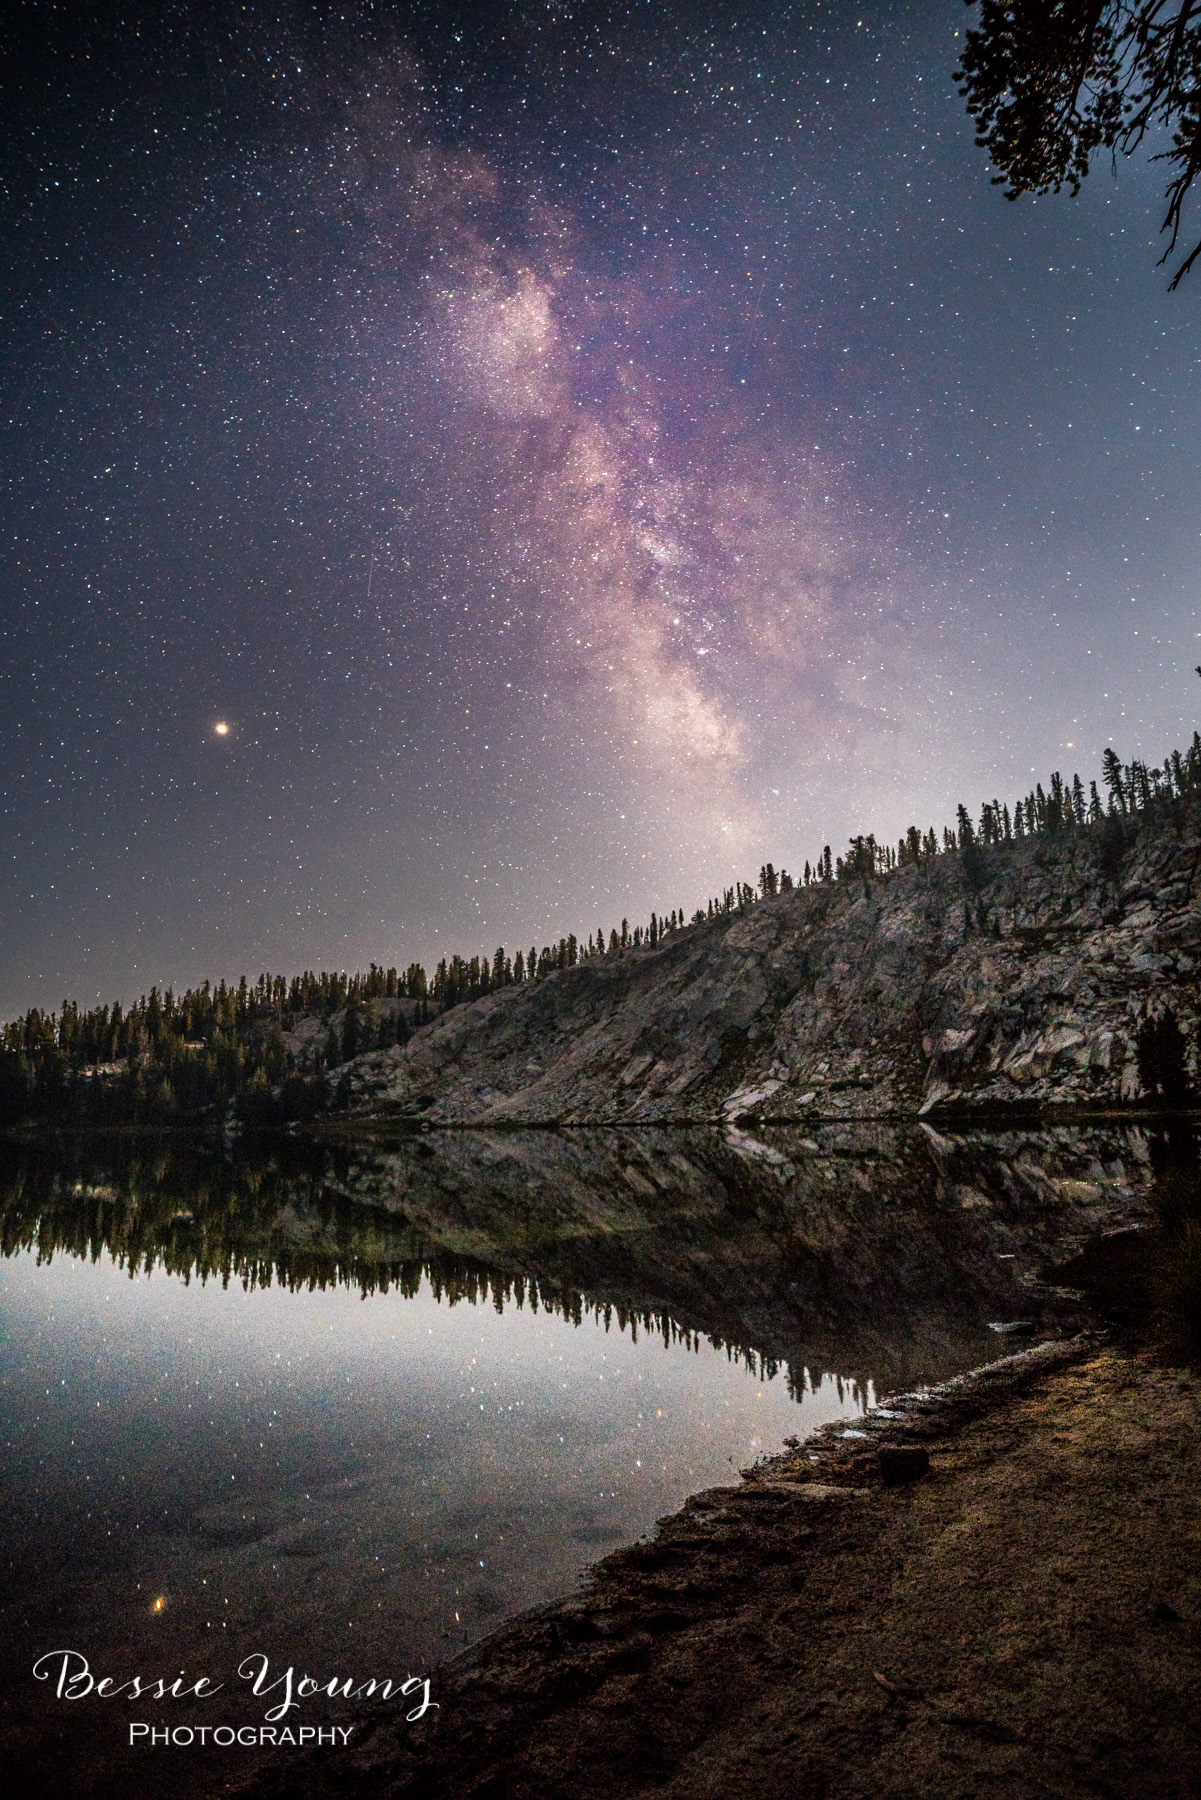
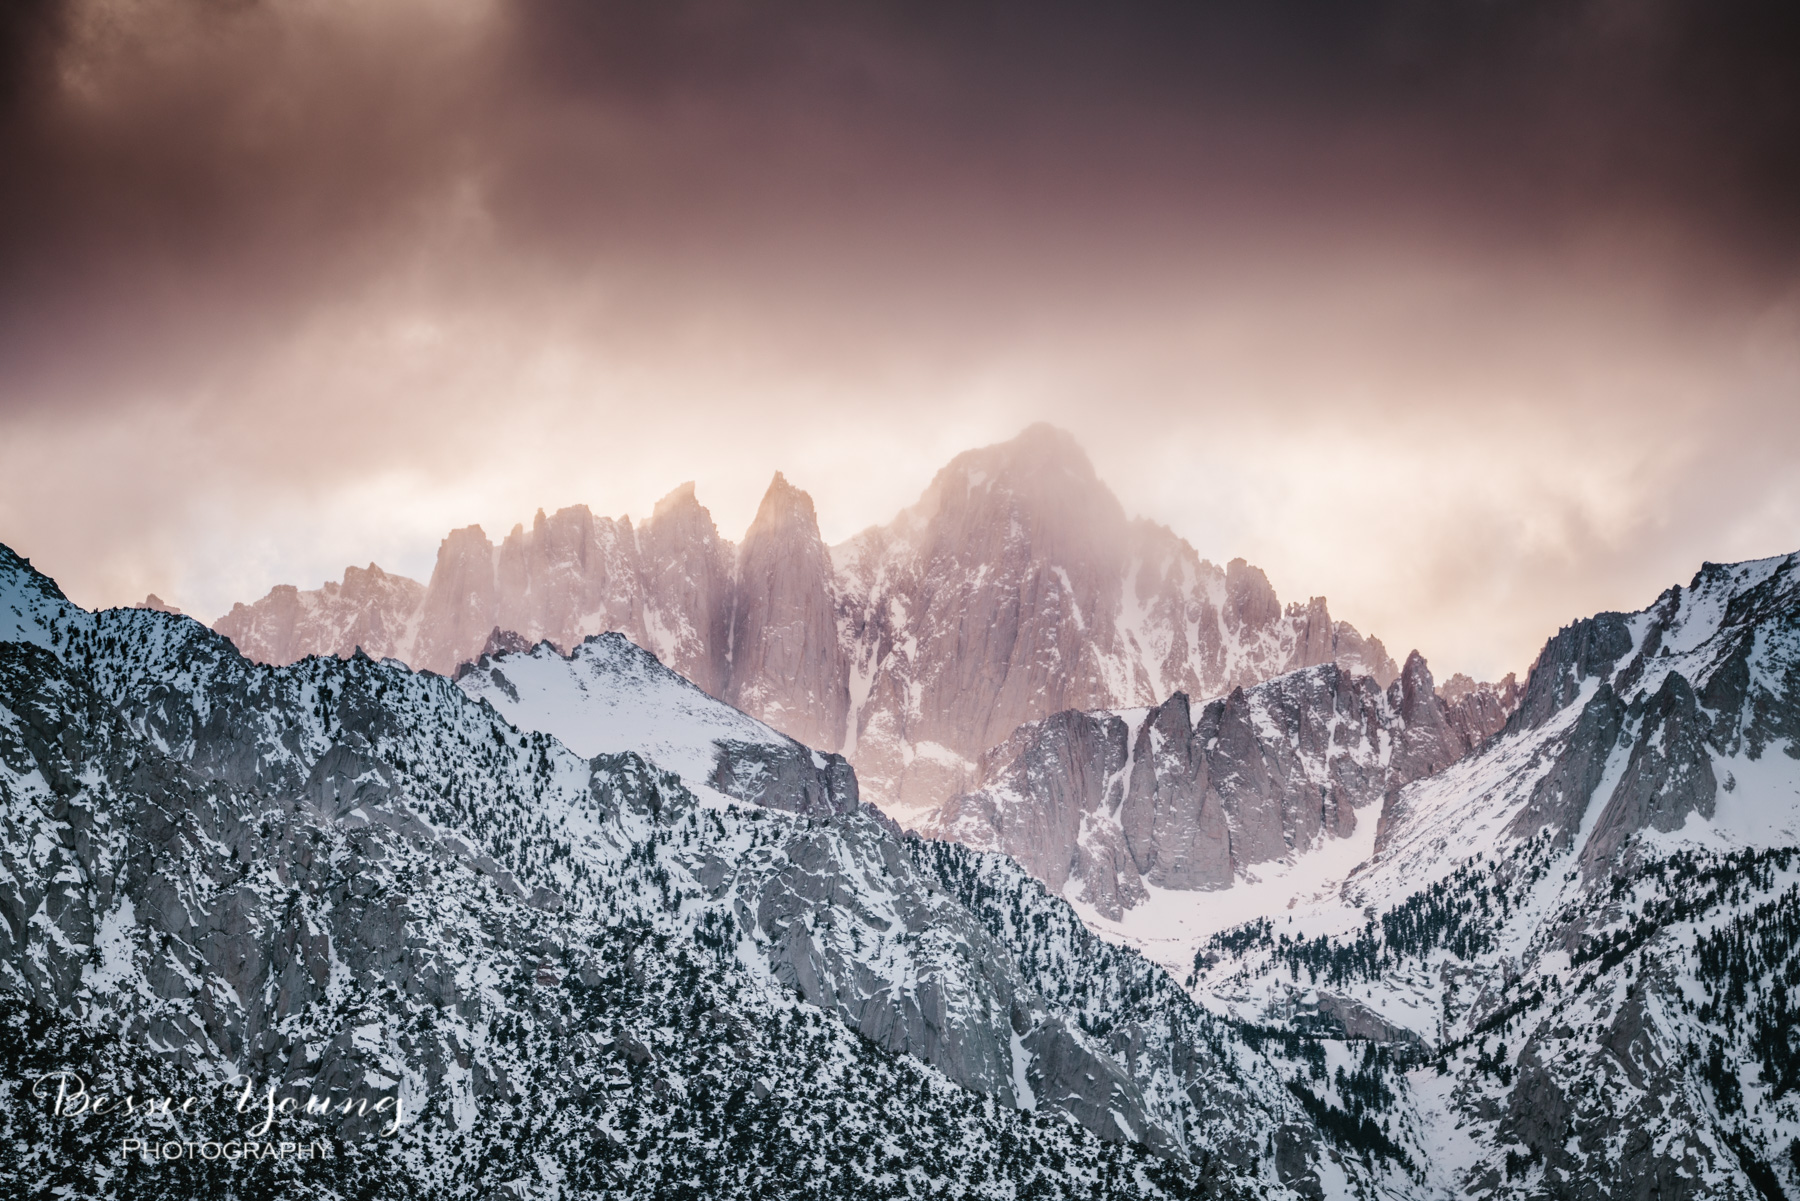
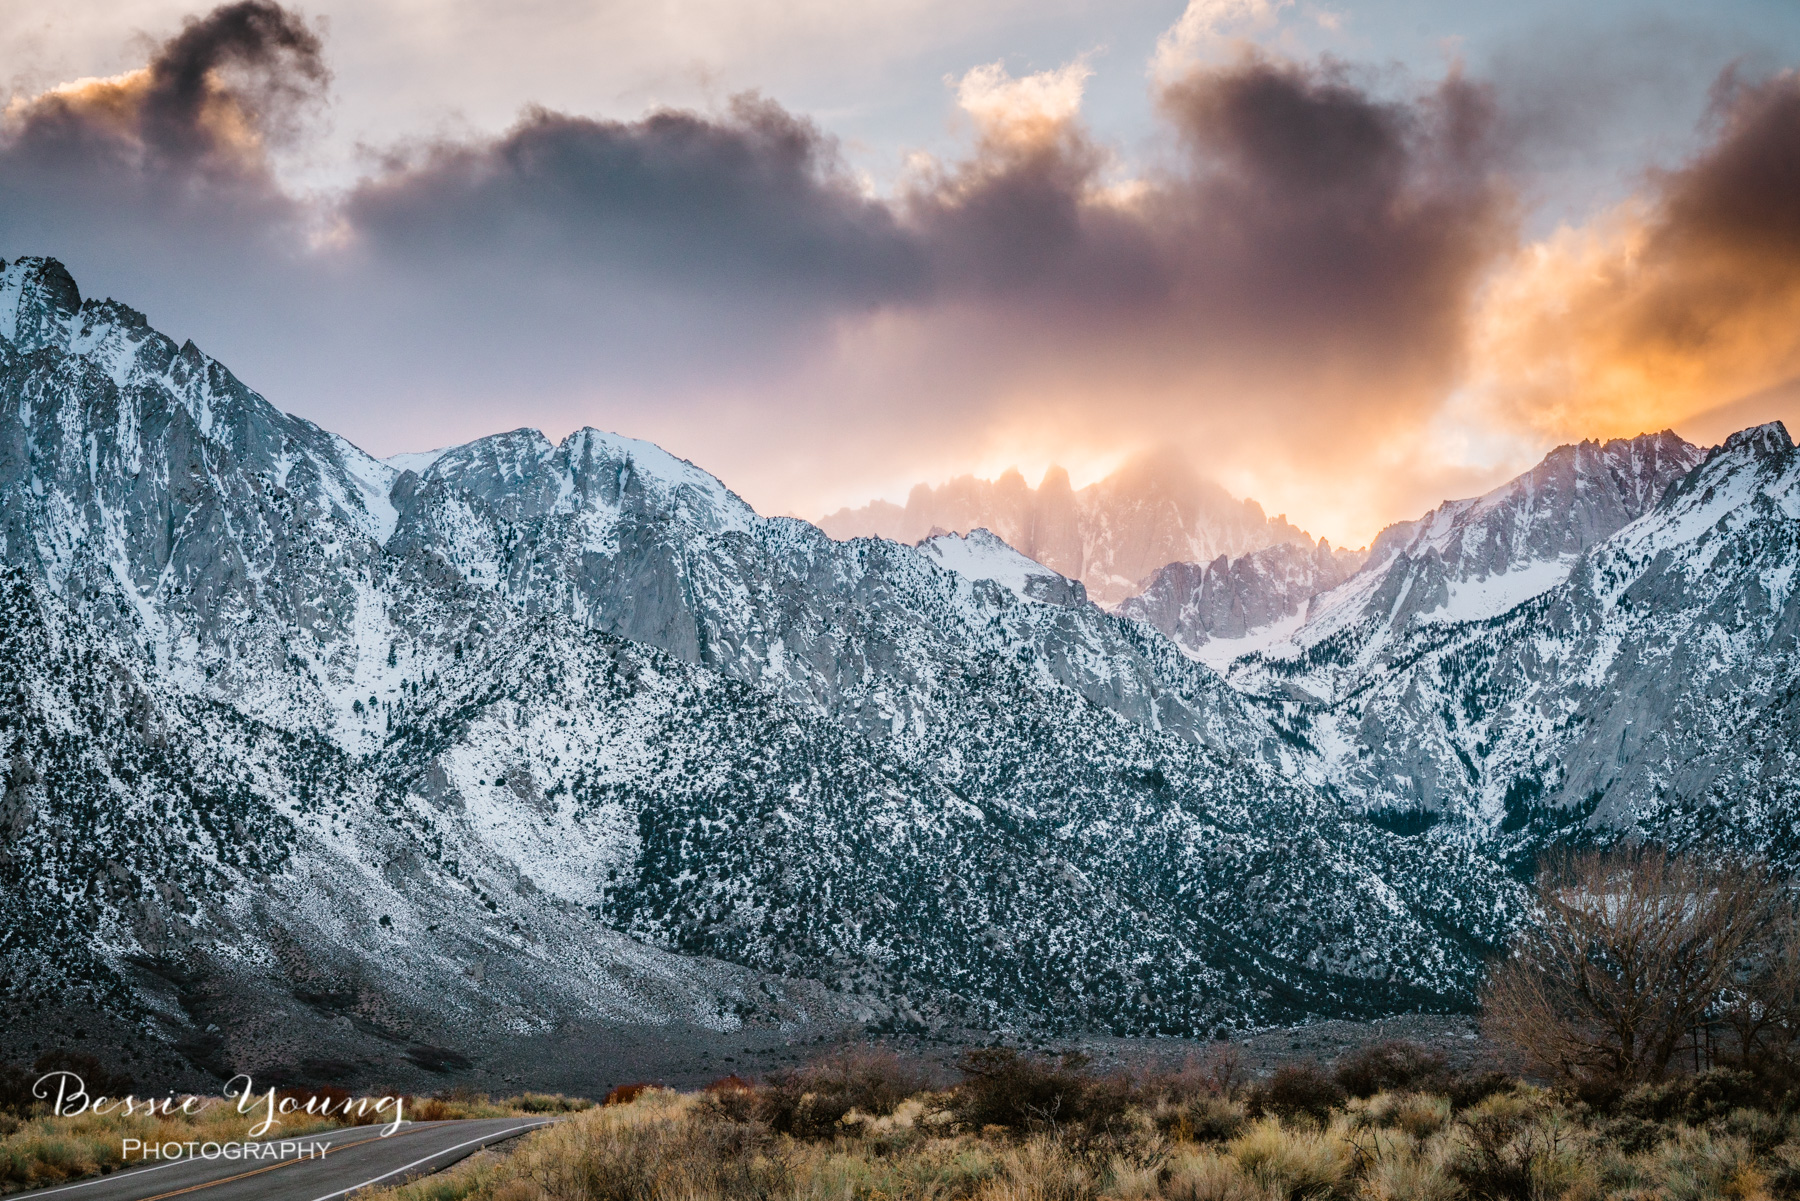
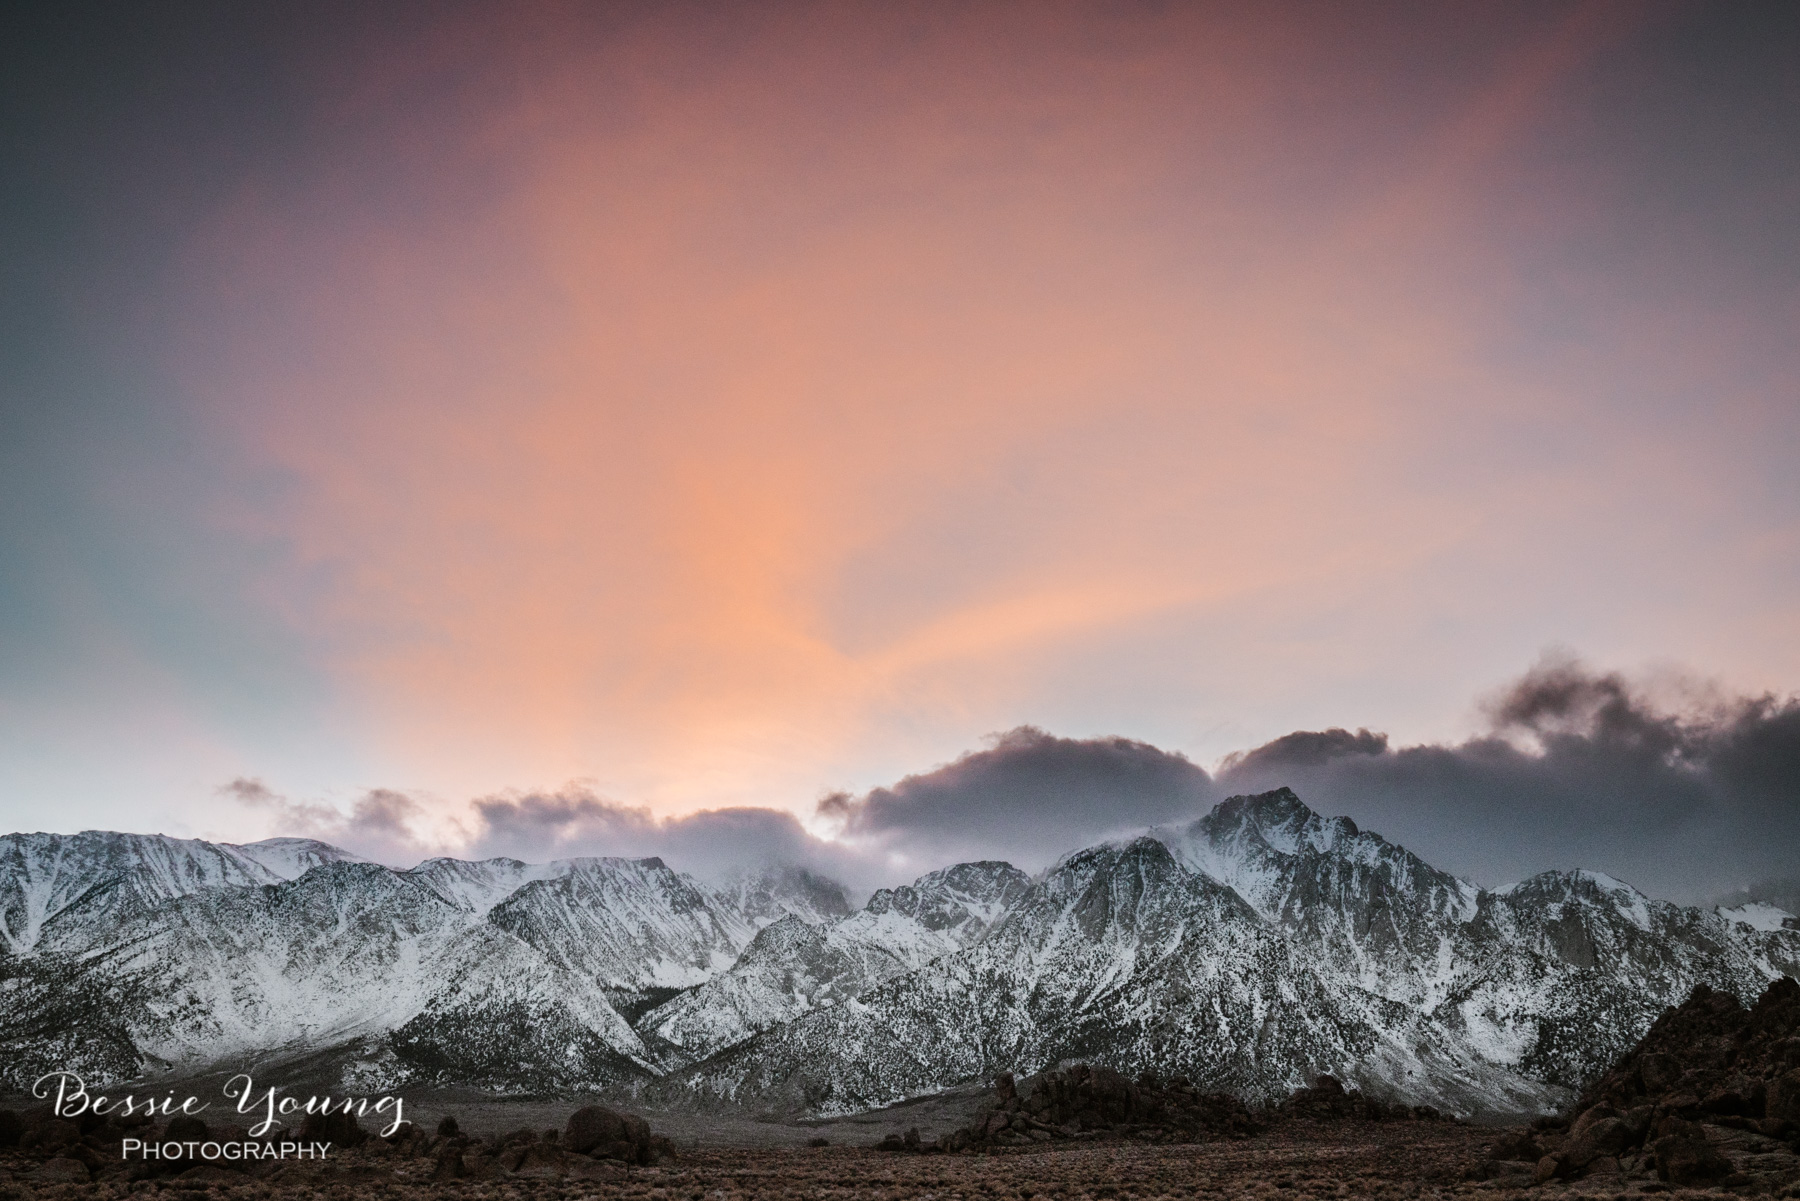
I rolled into Alabama Hills about 4:30. PERFECT Timing let me tell you. I was super stoked because I also got to get some amazing sunset images. I mean seriously though, I took way too many sunset pictures. The clouds kept changing and things just were getting better and better. It was absolutely gorgeous. I wish I could share all the images with you.

Alabama Hills California Sunset - Fine Art Photography by Bessie Young Photography
Rising Super Blood Wolf Moon January 2019 by Bessie Young Photography Landscape Photography

Actually, I got so caught up in taking sunset images, I didn’t leave much time to set up for the moon rise. Luckily, I was able to get both sunset and moon rise! YAS!

The sky was partially cloudy, which made for some amazing sunset pictures, but it sure made me nervous for the moon. I wasn’t sure if I was going to be able to see it at all.

Since the Blood Moon wasn’t supposed to begin until around 8pm, I had plenty of time to go grab some dinner. After dinner I headed back out. Let me tell you friends, it was freaking windy and cold. Like cold, cold cold. I had my down jacket on, a beanie, and hand warmers, and man it was cold.

Rising Super Blood Wolf Moon January 2019 by Bessie Young Photography

Getting the Shot: The Super Blood Wolf Moon

Super+Blood+Wolf+Moon+Landscape+Photography+by+Bessie+Young

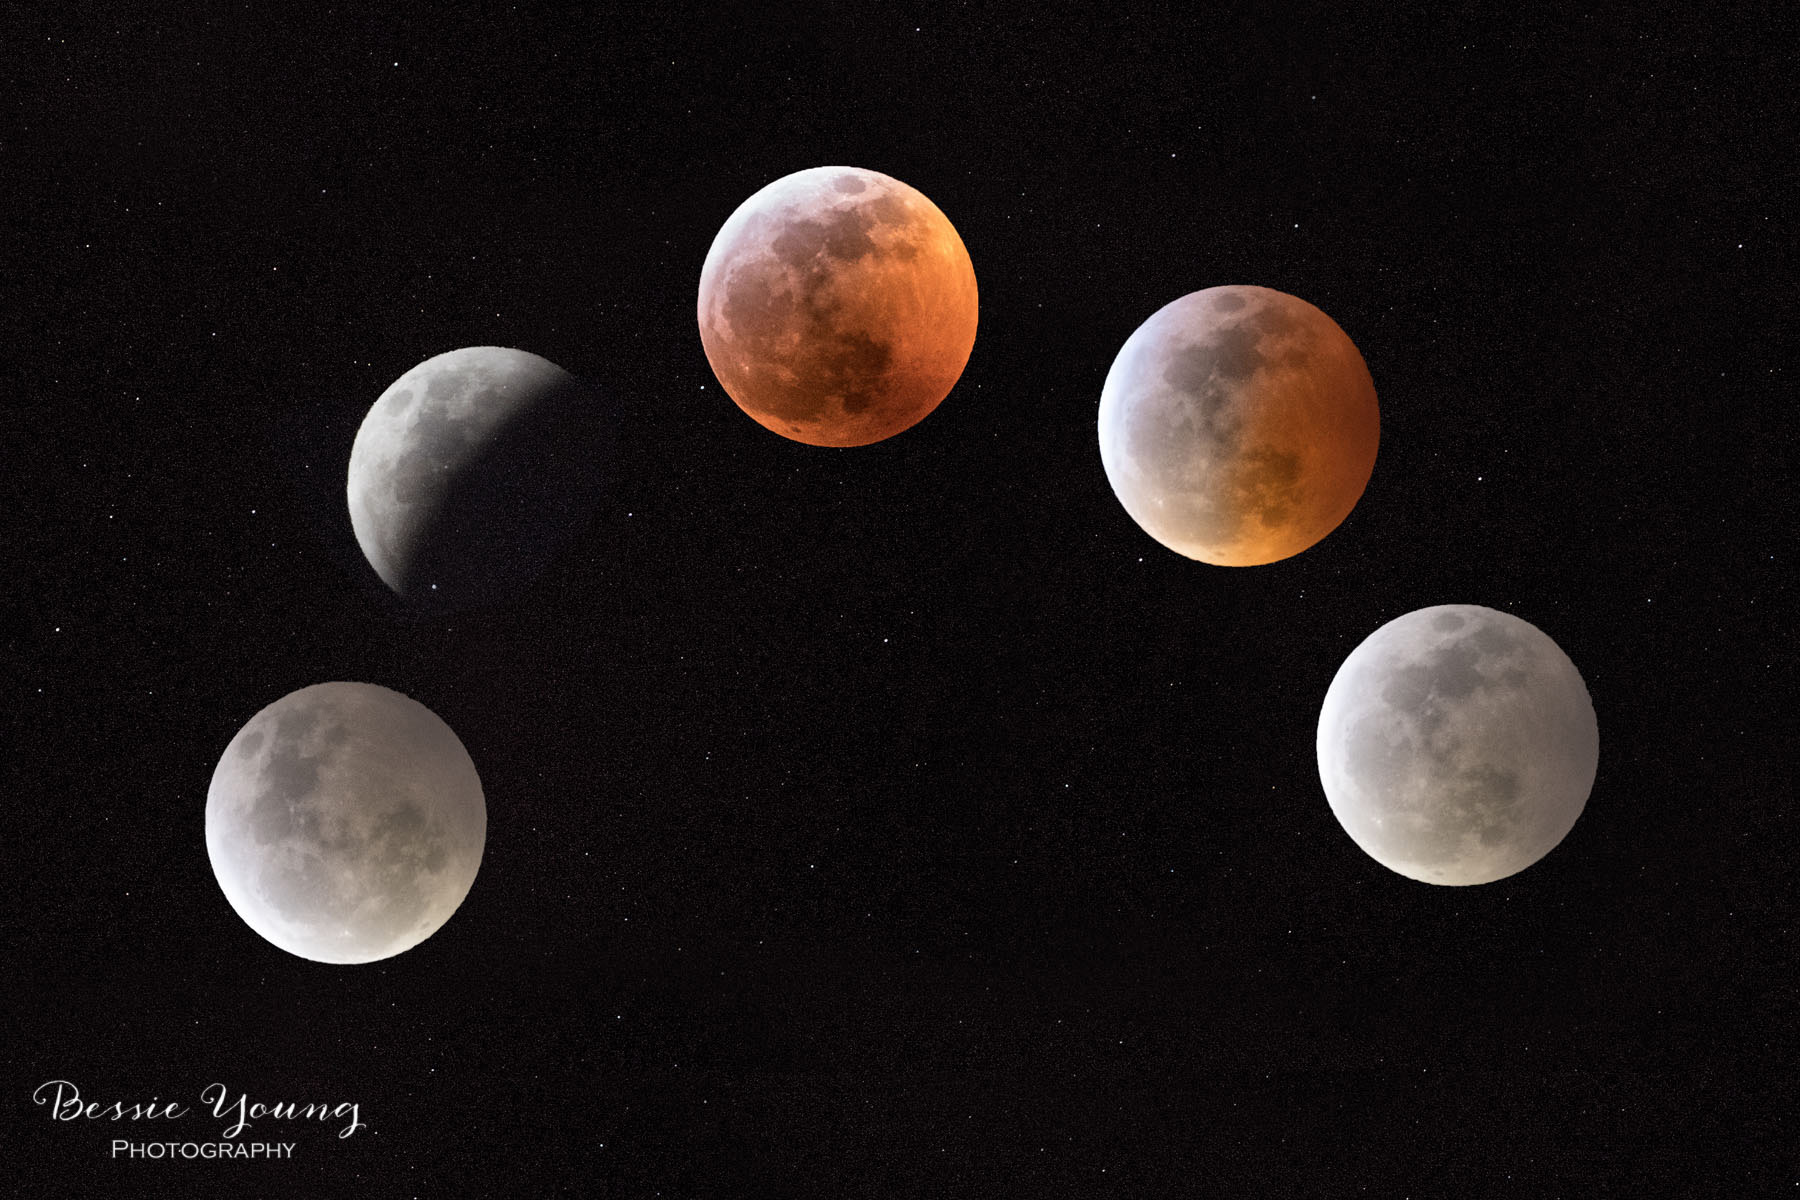
As I sat in my car, I looked up at the sky to only see clouds. You could see portions of the clouds lit up due to the brightness of the moon, but no moon! I sat there for a bit with the moon peaking out and then hiding behind the clouds. It played this game for almost an hour. As it started to peak out, I noticed that the eclipse had stated.

Well I guess I am not going to get the shot after all

The most frustrating part of this whole thing was that the clear sky was just at the edge of the moon. Yas, it was inches away from being visible. How frustrating is that?!

So, I figured, I would get all my stuff set up just in case. I opened my door, and the wind almost tore it off. To the East was the clouds and the eclipse occurring right before my very own eyes, being hidden by the clouds. To the West there was a lightening storm. Where I stood was open skies with the wind whirling around me.

Super Blood Wolf Moon Landscape Photography January 2019 by Bessie Young Photography

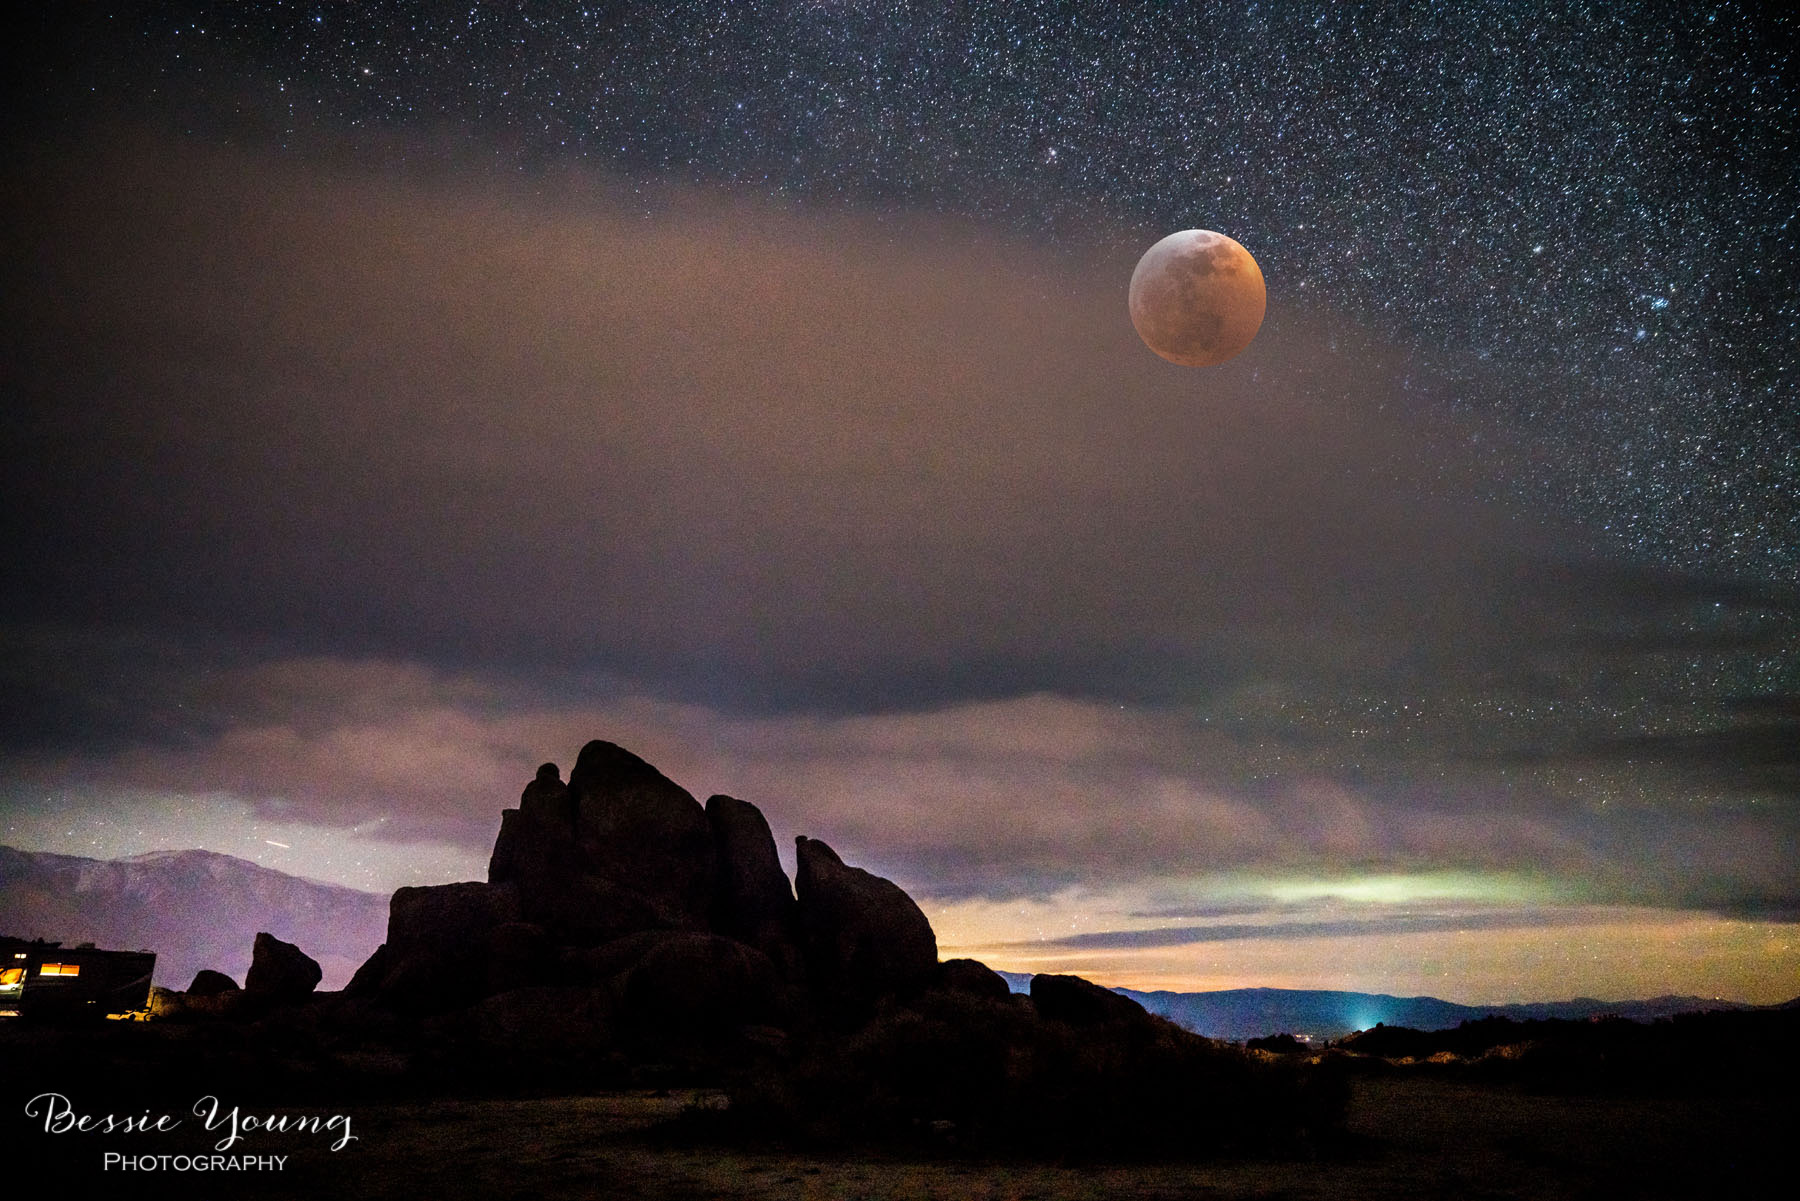
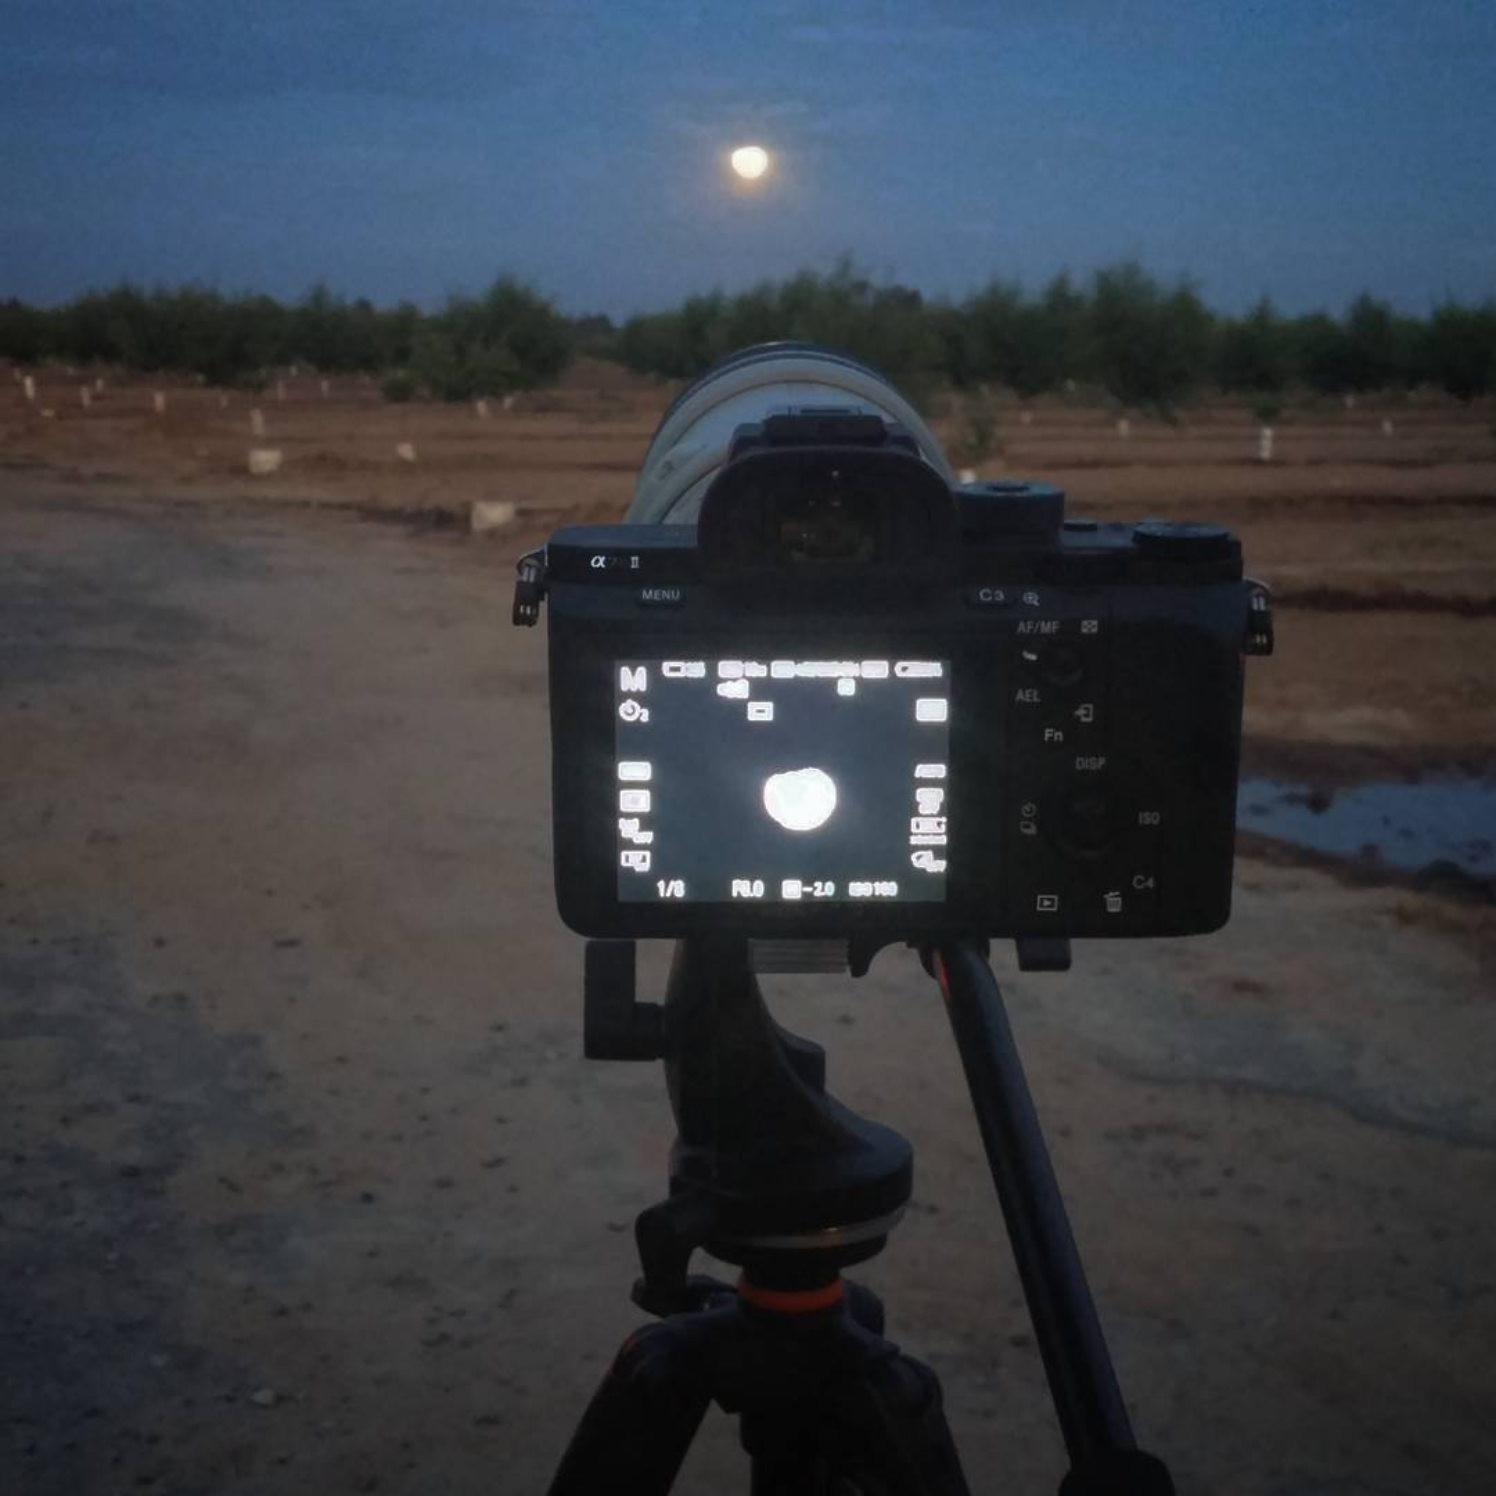
As I set up my tripod, in the dark, the wind wanted to blow the entire set up over. I tried to get a few shots of the moon with the cloud cover and was completely unsuccessful. Eventually, I moved the car to block the wind. I sat there… waiting….

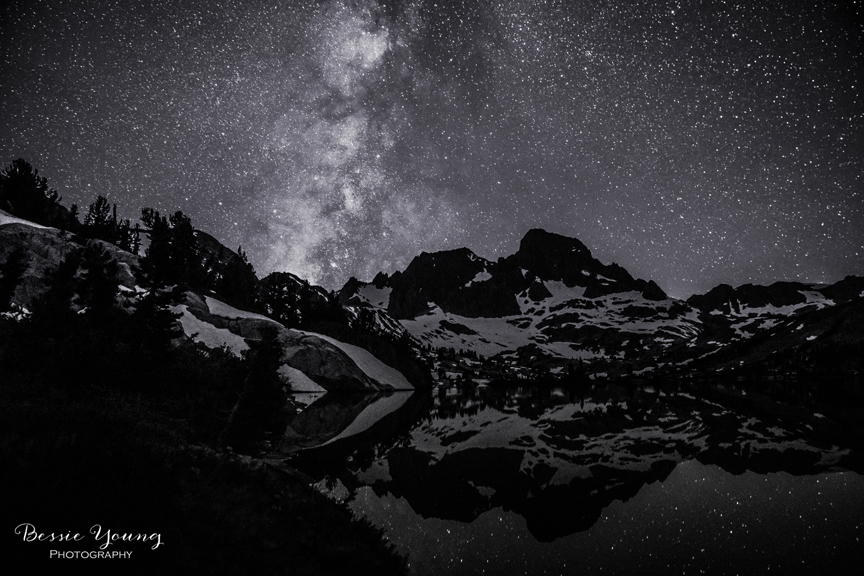
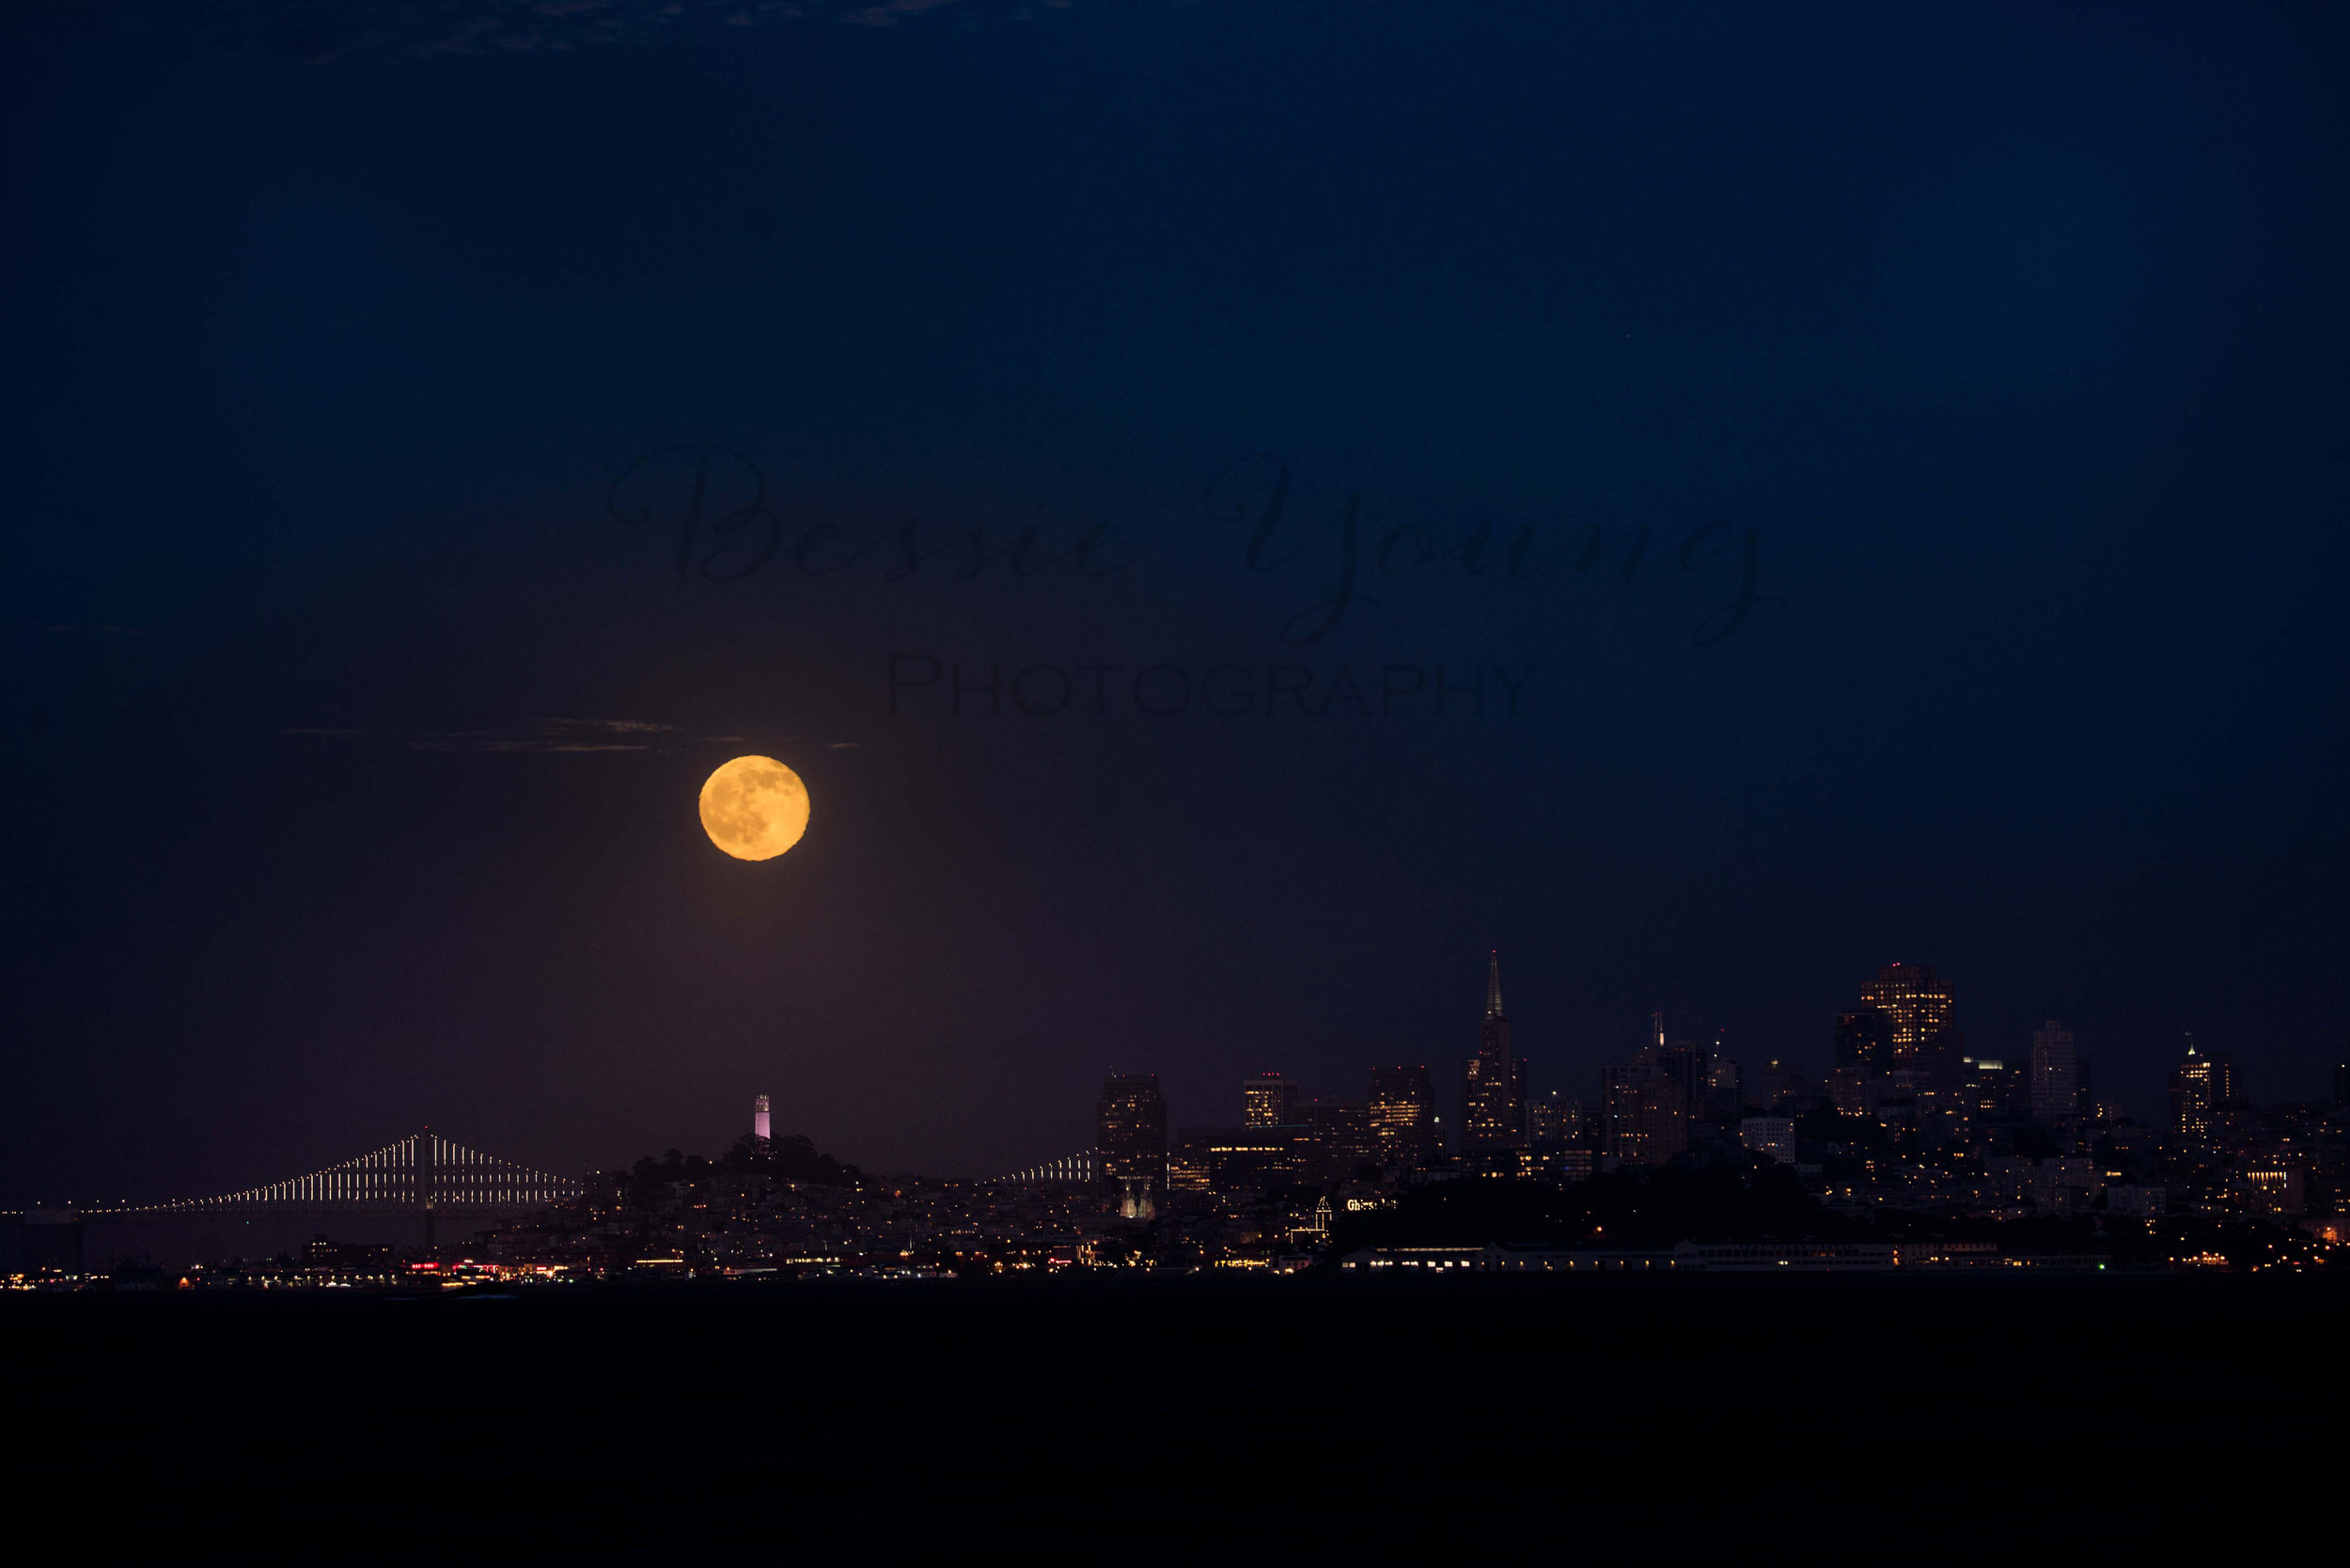
I could see the moon beginning to turn red, but the cloud cover was just barely too much that all my images were turning out blurry. All of them were blurry!!! I got a couple mediocre shots and the moon went completely behind the clouds for what seemed like forever. It was over, I was packing up. No reason to sit and stare at the night sky hoping for something to happen.

I packed up all my things and sat in my car. Checked my phone, and just tried to get a bit warm. Then, out of no where, the MOON!!!! The full blown MOON!!!! I scrambled, cursed a little, and then jumped out of my car, set my equipment back up and BOOM! I FREAKING GOT THE SHOT!

It was awesome and I am so dang thankful that I didn’t drive away when I was thinking about driving away!

Super Blood Wolf Moon Landscape Photography January 2019 by Bessie Young Photography

What Were My Settings for the Moon Images?

I played around quite a bit with my settings and eventually settled on

Shutter Speed: 1 second

ISO: 2000

Aperture: 5.6

I hope you all enjoyed this blog. Were you able to see the Super Blood Wolf Moon? Did you photograph it? If so leave a comment below . I would love to hear about your trip!

Wishing you nothing but amazing adventures and pretty pictures!

Bessie


P.s. Did you like this blog? Check out these ones as well:

How to Photograph the Super Blood Wolf Moon January 2019 | How to see it in California

It’s tonight! The Super Blood Wolf Moon Lunar Eclipse is happening and the sky is going to be putting on a pretty darn awesome show. I am sure even just hearing the name you are interested, but what is it and how do you see it? Here is everything you will need to know about this phenomenon :

Super Blood Wolf Moon January 2019 | How to see it in California

When is the Super Blood Wolf Moon?

Sunday January 20th into Monday January 21st, 2019 (depending on where you are located in the USA)

The Lunar Eclipse will begin around 11:30 ET which means about 8L30 Pacific time.

You will want to start watching the sky around 7:30pm. if you are in California. As the Earths shadow begins passing in from the lower left. Totality will be around 8:40 and the moon will return to its normal appearance around 9:40pm.

What is the Super Blood Wolf Moon?

This term is being used because there are several events happening all at once. It sure is a mouthful but lets break it down a little.

Super Moon: A super moon occurs when the full moon is at its closest point to the earth.

Wolf Moon: Every month has special names to describe the full moon. For January it is Wolf Moon. It originates from the Native American folklore.

Blood Moon: This is going to be the coolest part of the show. This is the lunar eclipse where the moon will turn a blood red color as it passes the Earths shadow.

How to see it:

accuweather.brightspotcdn.com.jpg

You will need to be outside, during the right hours, with clear open skies. If it is cloudy, which is what the California weather is calling for, you unfortunately will not be able to see it.

Most of the US will have the ability to see the Super Blood Wolf Moon this January. You will not need any special equipment to see it. Just your own two eyes.

How to photograph it:

You will need a variety of things…

Super blood wolf moon January 2019 | How to see it in california by Bessie Young Photography
  1. Plan out your location - scout it out to find the best composition

    • Decide if you want a large landscape shot, or just the moon shot. This will determine your lens.

  2. Make sure it is clear skies

  3. Be at your location well before the occurrence

  4. Tripod

  5. Camera

  6. 100-400+ mm lens

    • This will be more for just a moon image. If you want more of a landscape you will use a 70-200mm lens

  7. Head lamp

  8. Camera remoted

  9. Warm clothes to make sure you are comfy and warm. This way you are having fun rather than miserable and only thinking about how cold your toes are :)

  10. Snacks and drinks to make sure you are comfortable and enjoying the show

That’s it! Now get out there and freaking get some amazing moon images! Are you going out to see the show? Comment below and let me know where you will be viewing it from, what kind of gear you plan on using, and all the deets!

I can’t wait to see your photos!!

Bessie

How To Take Night Photos

How To Take Night Photos

Photography Tips and Tricks

So, how in the literal heck do you even start to take photos at night in order to create a beautiful jaw dropping image?

All Images For Sale in the BYP Shop-

Click the image to purchase or click the buy me button below.

Well my friend I am here for you! I am super excited to share this video and blog with you for so many reasons, but the main reason is because for years, and years, and years I struggled with taking night photos.
I spent countless hours researching it. I had so many failed attempts testing out the tips and tricks that I was reading online , or in photography magazines, or watching YouTube videos .
I did all the things and still could not get good night photos. My pictures were dark, muddy, grainy, blurry, and everything bad about a photo.

After years of trial and error I have finally compiled some of the main tricks that I've learned and taught myself when it comes to taking night photos. I am so beyond excited to share this information with you guys to really help you , and help you not have to spend all the time doing all the research.

Tips on How To Take Night Photos

How To Take Night Photos by Bessie Young Photography Tips and Tricks - Landscape Photography.jpg
  1. Use a full frame camera

  2. Use a fast wide angle lens (aperture 2.8 or below)

  3. Invest in a good tripod

  4. Check the weather - make sure that the sky is going to be pretty much clear skies

  5. Make sure the moon is small or that there is no moon at all. A mood that is over a quarter moon is going to be way too bright.

  6. Scope out your location and find the best composition while it is day time and light outside.

  7. Focus your lens while it is day light! Oh my gosh this is huuugggeeee! I couldn't ever figure out how to get those tack sharp images. I would always "focus to infinity" because that is what everyone said to do, but guess what.... THAT DOESN'T WORK! Infinity has a little bit of wiggle room and that is really going to make or break your image. So after you are done scoping out your location (tip 5). Set up your tripod and focus your camera. This way, when it is dark outside you will not have to try to figure out how to focus. You will know already where to focus your camera at and you will be good to go!

  8. Shoot in Raw

  9. Start off with settings at ISO: 2000 | F2.8 | Shutter 10" and go from there. You are going to have to play around just like any other landscape photo. Make sure that you get a few variations and that way you can pick your favorite in post.

  10. Get a star app (I use PhotoPills)

Now go out there and try these photography tips and tricks on how to take night photos!

Leave a comment below and let me know what your favorite tips are or if you have any additional tips that I didn't mention :) . Don't forget to share this with all your shutter bug friends!

Wishing you nothing but a beautiful day!

Bessie


P.S. Did you love this post? Want to see more photography tips and tricks? Check this out here:

Solar Eclipse 2017 | Landscape Photography

Preparing for the Solar Eclipse 2017:

Let's just say that I had planned to go see the Solar Eclipse 2017 since 2016. I was so excited about it and had a plan to travel to Wyoming to witness the natural phenomena. The plan was to watch the Solar Eclipse in Wyoming, and then adventure into Yellowstone National Park. This seemed like an awesome plan to me. As the Solar Eclipse started getting closer some unsettling stories began to surface. Small towns worried about not being able to handle the crowd, running out of gas, sewers not being sufficient.  Some small towns were preparing for the eclipse the same way they would prepare for a natural disaster. Word was every small town in the path of totality was going to become a parking lot.

One week before I left for Wyoming, I decided to change plans. My new plan was to head up the California Coast and into Oregon. This took a bit of research in order to find places to camp along the way as everything seemed to be full the closer you got to the path of totality. I ultimately decided that not seeing totality was going to be good enough. I opted for a less stressful adventure, less people, and hopefully less traffic. Honestly, I wasn't even sure I was going to be able to get a good photograph of the eclipse (yes I was nervous and doubted my capability), so going into the path wasn't something that was a must for me. I wanted to get as close as I could get without sitting in traffic for hours.

Ready to Photograph the Solar Eclipse?.......Not really:

Leading up to the Solar Eclipse, let me tell you, I did my research when it came to how to photograph it. I knew I had to get the series of images. You know the one that shows all the different phases of the Solar Eclipse. Everything I read was that an ND filter would be sufficient to take Solar Eclipse photographs. I read it on the internet so it must be true, right?  Um, no.  PLOT TWIST!

The night before the solar eclipse I read an article on the Sony website - why didn't I go their first? Then another article and another, explaining that an ND filter wasn't sufficient.  Using one would reduce my camera to a paper weight. I needed to have a Solar filter. I had the wrong filter! Obviously I couldn't find a solar filter the night before the Solar Eclipse. What was I going to do? Was this it? Did I travel all this way to not get the picture?

After doing a bit more research I found out that I could use a welders lens. That is right a welders lens! You know the lens that welders use in their helmets. The search was on. Where could I get one? Where could I find this, last minute, in the little ocean town of Bandon on a Sunday evening? Nowhere, that's where. I feared I might not be able to capture the solar eclipse but hey, least I found out before I ruined my camera.

Undeterred I made a plan.

Up before the sun:

My goal was to make it as close to the zone of totality as I could without getting stuck in the crowds. I was aiming for Roseburg but if I could get further North I would. I woke up early but that wasn't the difficult part. The difficult part was not having coffee :( that's right... I hit the road without a drop of coffee. Who does that anyways?

As I traveled along Hwy 42 towards Roseburg I passed through the small town of Coquille and guess what... they had a little drive through coffee stand. You don't even know how excited I was.  With a new vigor I continued on to Winston.  As I pull into town I see a hardware store.  Surely they would have a lens, right?  Wrong.  Sold out.  Now where?  NAPA!  That's where.

I called Napa not realizing it was right around the corner from me.  When they said they actually had a couple I about lost it.  Pretty sure I was yelling at the guy on the phone when I said I'd be right over. You guys have no idea how excited I was to hear this. I could actually get the pictures of the Solar Eclipse! Now to find the perfect secluded spot to photograph the eclipse.

The set up:

I found a spot along a country road that would work perfectly. I was at a location that was about 97% totality (meaning 97% of the sun would be covered by the moon).  The ideal spot to capture the photo I have always dreamed of capturing.

The Solar Eclipse 2017 began around 9 am. There are various phases of the Solar Eclipse and I wanted to capture them all. At 10 am it started to get darker and the temperature started to drop. The darker it got, the cooler it got.  Eventually I needed my jacket. 10:21 was the full solar eclipse and at 10:23 it was over. It got about as dark as dusk and then began to slowly get brighter and warmer.

The Final Image:

I got it, I did it and I was able to document to Solar Eclipse 2017! Ultimately, I stayed at my location until about 11:40 because I wanted to make sure to capture the all the different phases of the event. Doing so I was able to create this image:


Although I didn't get the one image with full totality, I am absolutely excited with the way that this turned out! How awesome is this?!

If you want to read a little more about the solar eclipse, how it happened, where it was, and so forth check out this article here.

Note: The solar eclipse image is available for sale on my website here.

Wishing you all nothing but beautiful adventures,

Bessie


P.S. wanna know what gear I used? Check it out here:

Kit Used:

Camera: Sony A7Rii: http://amzn.to/1taGpAu
Favorite Lens: Sony FE 24-70 F2.8 G Master: http://amzn.to/2n747NJ
Wide Angle: Sony 16-35mm lens: http://amzn.to/1UBjBDW
Vanguard Tripod: http://amzn.to/2aoI5ku

Filming:
Samsung Note 4 smart phone

Editing & Processing:
Bulk editing: Adobe Lightroom: http://amzn.to/1WB7Jnc
Fine tuning: Adobe Photoshop : http://amzn.to/1WB7YPh
Viva Video Pro for combining videos

Ironstone Vineyard 4th of July Celebration

Happy 4th of July weekend!

I hope you are all having an amazing long weekend and enjoying every bit of it!

Yesterday, July 1st 2017, Ironstone Vineyard in Murphys California put on a phenomenal firework show. This is something they have been doing for quite some time and I was lucky enough to be able to go! The show started as sundown; however, you could get there early to claim your seats, listen to music, and enjoy the afternoon. The festival had different food vendors, some various booths, live music, along with beer and wine.

This Celebration was definitely the place to be. The place was packed to say the least. As far as the details... it was $15 per person to enter into the festivities. For this year they allowed dogs, but they did not allow you to bring in your food and drink (this includes no water). Be prepared for that.

(Just as a side note, if you are going to bring your dog to a firework show, be responsible as most dogs get scared of fireworks.)

Everyone brought chairs, blankets, and lots of laughs. There were large grass areas to set up your spot for the evening with plenty of shade. Some people even brought shade covers. This is a very family friendly place to be during the 4th of July. Talk about a great place to bring the kids and just relax.

It was so much fun and the firework show lasted an hour!!! A whole hour!! Talk about amazing :)  If you get a chance to make it out to their next firework show take advantage! Calavaras county and Tuolumne county are both counties that restrict fireworks. There are some great places to attend a good show, but let me tell you.... Ironstone Vineyard put on a fantastic show!

Here is a fair warning... Getting out of the parking lot after the event was crazy. It took over 45 minutes to leave the parking lot and get on the road. There is only one small road that goes into the gravel parking lot, one small road that exits the paved parking lot, and with that many people in one spot made for some major traffic. There was no one guiding traffic which made for a free for all. Just saying...

Ironstone Vineyards 4th of July Celebration  - Bessie Young Photography-Combined Gage 1.jpg

Are you wanting to learn more about how to take firework pictures? Check out this post with some great quick tips to get you started and ready to take pictures this 4th of July!

I hope you all enjoyed this blog. If you did don't forget to subscibe to get the latest news.

Wishing you all a happy 4th of July!

Bessie


P.S. wanna know what gear I used? Check it out here:

Kit Used:


Camera: Sony A7Rii: http://amzn.to/1taGpAu
Favorite Lens: Sony FE 24-70 F2.8 G Master: http://amzn.to/2n747NJ
Best Wide Angle: Sony 16-35mm lens: http://amzn.to/1UBjBDW
Vanguard Tripod: http://amzn.to/2aoI5ku

Filming:
LG G3 Smart Phone

Editing & Processing:
Bulk editing: Adobe Lightroom: http://amzn.to/1WB7Jnc
Fine tuning: Adobe Photoshop : http://amzn.to/1WB7YPh
Viva Video Pro for combining videos


Hot Air Balloon Festival - Pahrump, Nevada


Hot Air Balloon Festival - Pahrump, Nevada

by Bessie Young


Spontaneous Adventures are the best types of adventures

This weekend I decided to go adventuring into the desert. I found out that in Nevada there is a little town called Pahrump that has a hot air balloon festival! The festival has hot air balloon rides, a Ferris Wheel, and then in the evening they have an amazing hot air balloon light show that is timed to music.

Driving to Pahrump took approximately 6 and a half hours. I decided to go down Hwy 99, then up over Hwy 58, along Hwy 15, and then take Hwy 178 into Pahrump, Nevada. This route made it to where there would be ample places to stop and take breaks, fill up on gas, and allow the best scenery of the desert.

I had booked a little cabin at the Preferred RV resort. It was such a cute little cabin and totally worth it as it was about half the price of any hotel room. This little cabin was equipped with a bed, bathroom, kitchen and living room. It had a TV, pots and pans for cooking, along with a coffee pot! The cabin was pet friendly which is a must for me as we all know I can't go anywhere without Yota.

The Festival

The balloon festival lasted all weekend. In the morning they had a little take off session for the balloons. Then in the afternoon there were different types of vendors, carnival rides, and hot air balloon rides. Around 6:30 the balloon light show started, on both Friday and Saturday, and lasted until about 6:50pm. People began gathering around the field at about 5pm. This festival was definitely a happening place. I got there around 5 for the light show to claim my spot. The good spots filled up fast around the field, so I was happy that I got there so early.

To find out more about the festivities check out their site here.

It was a little cold that evening. I had on a warm jacket, long sleeves, jeans, and boots. Even with all that, my toes were still super cold. If you do plan on heading out to this balloon festival make sure to pack an easy to carry chair, like this one, and some warm clothes.

All in all, this balloon festival was alot of fun. The timing was a little off as the flyer said the light show started at 6, but it really started at 6:30. There were two balloons that you could ride in. The balloons were tethered to the ground and the tickets were $10 each. If you wanted to get up close and personal to the balloons you could pay a VIP field entrance fee of $30. This allowed you to get much closer to the balloons during the light show. If not, you needed to stay behind a fence (which is what I did).

For me, it was all about the picture opportunity and the light show. The pictures turned out fantastic!

I hope you all enjoyed this post!

Wishing you nothing but fun adventures,

Bessie

------------------------------------------------------------

Wondering what gear I used? Check it out here:

Kit Used:


Camera Sony A7Rii: http://amzn.to/1taGpAu
Wide angle lens Sony 16-35mm lens: http://amzn.to/1UBjBDW
Standard lens Sony Master 24-70mm lens f2.8: http://amzn.to/2l6tTSA
Vanguard Tripod: http://amzn.to/2aoI5ku

Editing & Processing:
Adobe Lightroom: http://amzn.to/1WB7Jnc
Adobe Photoshop : http://amzn.to/1WB7YPh


Perseid Meteor Shower

Perseid Meteor Shower

Millerton Lake Fresno | August 2016 Adventure


Keep your eyes on the stars, and your feet on the ground. Theodore Roosevelt

An all too familiar tune was sounding in the far distance. I rolled over and rubbed my eyes, picked up my phone to see the the time.... 12:30am... my alarm going off nice and loud. Turning it off I rolled over on my back, rubbing my stinging eyes, and then Boom it hit me... the meteor shower! It is time to head out and enjoy the yearly meteor shower, not to mention get some amazing photos :)  I had originally planned to pull an all nighter, but why do that when you can get a few hours of shut eye and still enjoy the natural occurrence?

Perseid Meteor Shower by Bessie Young Photography

All my things were already loaded in the car. All I had to do was walk outside and drive to my planned spot at the North side of Millerton lake!

The annual meteor shower hit its peak during the morning of Friday, August 12th. Each and every year, during August, the Earth passes through a trail of debris left by the comet Swift Tuttle. When this happens the event is called the Perseid Meteor Shower. This year it was predicted that at the height of the Meteor Shower there could be a soar of 200 meteors per hour during perfect conditions. Perfect conditions being clear skies, no artificial light, and a new moon. This year the moon is about half and sets around 1am which is the perfect time to go out and watch the show.

It is not in the stars to hold our destiny but in ourselves. William Shakespeare
Perseid Meteor Shower by Bessie Young Photography


Why should you make the effort to watch the Perseid meteor shower?

  1. To unplug
  2. Enjoy nature
  3. Enjoy solitude and reconnect with yourself
  4. Get inspired
  5. Be awestruck by God's creations
  6. Realize how small we really are in this massive world

How to watch the Perseid Meteor Shower:

  1. Plan to head outside before the August 24th
  2. Get away from any artificial light
  3. Plan out your spot and find an open sky
  4. Be ready to stay up late (past midnight)
  5. Look to the northern sky
  6. Bring a blanket , comfy chair, and some hot cocoa
  7. Don't forget about snacks and bug spray :)
  8. Enjoy the show!


It took alot of planning and quite a bit of effort but I made it! I was able to get some great photos and enjoy the show! Did you head out to see the meteor shower? Leave a comment below and let me know about your trip. Also, if you have any questions or just want to chat about my photography or my experience leave a comment. I would love to talk to you :)


Wishing you lots nothing but great adventures!


Bessie


P.S. for you photogs out there here is a list of the equipment I used:

Camera - Sony A7Rii

Lens - Sony 16-35mm f4

Tripod - Vanguard

Editing - Lightroom and Photoshop

All video was taken with my phone.


Summer Solstice | Strawberry Moon

Summer Solstice | Strawberry Moon

June 20th, 2016

By Bessie Young

It is Summer, it is the solstice the crowd is cheering, the crowd is laughing in detail
permanently, seriously without thought. - William Carlos Williams

I was one of the lucky ones....

Ding... my phone went off. Ding, ding... again. Ding, ding, ding.... again and again. I found myself in San Francisco on June 20th. My goal was to get pictures of the Golden Gate Bridge at sunset, but for some reason people kept texting me! As I stepped away from my camera and looked down at my phone to see what was going on I found that I had a few texts from different people. The first message 'hey girl! camping this Sunday?' ... the second message 'hello? what are you doing?' ..... the third message 'Heads up!!! There's a once in a generation event happening tonight! The strawberry moon! Summer solstice coinciding with a full moon!' .... the fourth message 'it's supposed to be the strawberry moon tonight just fyi'....

Umm what!!!! Yes, that got my attention in the matter of seconds. "once in a generation event"!! So of course I had to get my google foo on to research this so called strawberry moon. It just so happened that I was lucky enough to be in the right place at the right time! Talk about amazing! I was one of the lucky ones. One of the people that actually witnessed this event happening. I was even luckier as I just so happen to have all my photography gear in order to capture this amazing event! Wow, just wow!

So, what is this once in a generation thing that I am talking about? The summer Solstice and the Full moon occurring on the same day. The full moon rose on the same day as the June solstice for the very first time since 1948, and I got to photograph it!!

According the the farmers almanac:

“For the first time in nearly 70 years, the Full Moon and Summer Solstice coincide on the same day. This full Moon rises just as the Sun sets. The moment of full Moon is early Monday morning, 20 June. So it will look equally full on Sunday night and Monday night. You get two chances to enjoy the Solstice” strawberry moon!

Read the full article here:

http://www.almanac.com/content/first-day-summer-2016-summer-solstice

Learn more about the summer solstice and full moon occurrence from the National Geographic site here

or from the Treehugger site here

Gear used:

Camera - Sony A7Rii

Lens - Canon 100-400mm f4

Lens - Sony 16-35mm f4

Tripod

LG G3 phone for Remote to my camera

Wishing you nothing but great adventures and beautiful days!

Bessie